The following article provides a guided tutorial on creating stateful DevOps extension projects. Namely, it demonstrates how to successfully define extensions that are able to store data persistently in the external storages regardless of extension’s operating lifecycle.
First, it is essential to understand that a stateful DevOps extension project follows the same development principles as any other extension project. These principles and generic requirements are outlined in DevOps and Extension project articles.
Second, any type of the third-party storage supported by the platform of your choice (relational or non-relational, etc.) could be used for an extension project. To highlight this idea, we will build an extension using MongoDB NoSQL storage as opposed to the example of using the SQL storage within Account Notifications Extension noted above. No specific knowledge of NoSQL or MongoDB is required in the scope of this article.
Finally, this article does not cover various deployment layouts or specific recommendations for the potential set of extension storages. As a generic recommendation for security, load and operability, different storage instances should be used for development, testing and production environments of the DevOps extensions.
Start off by creating a new stateful DevOps extension project by repeating the Getting Started and Bootstrap Your Extension steps of the Extension Project documentation.
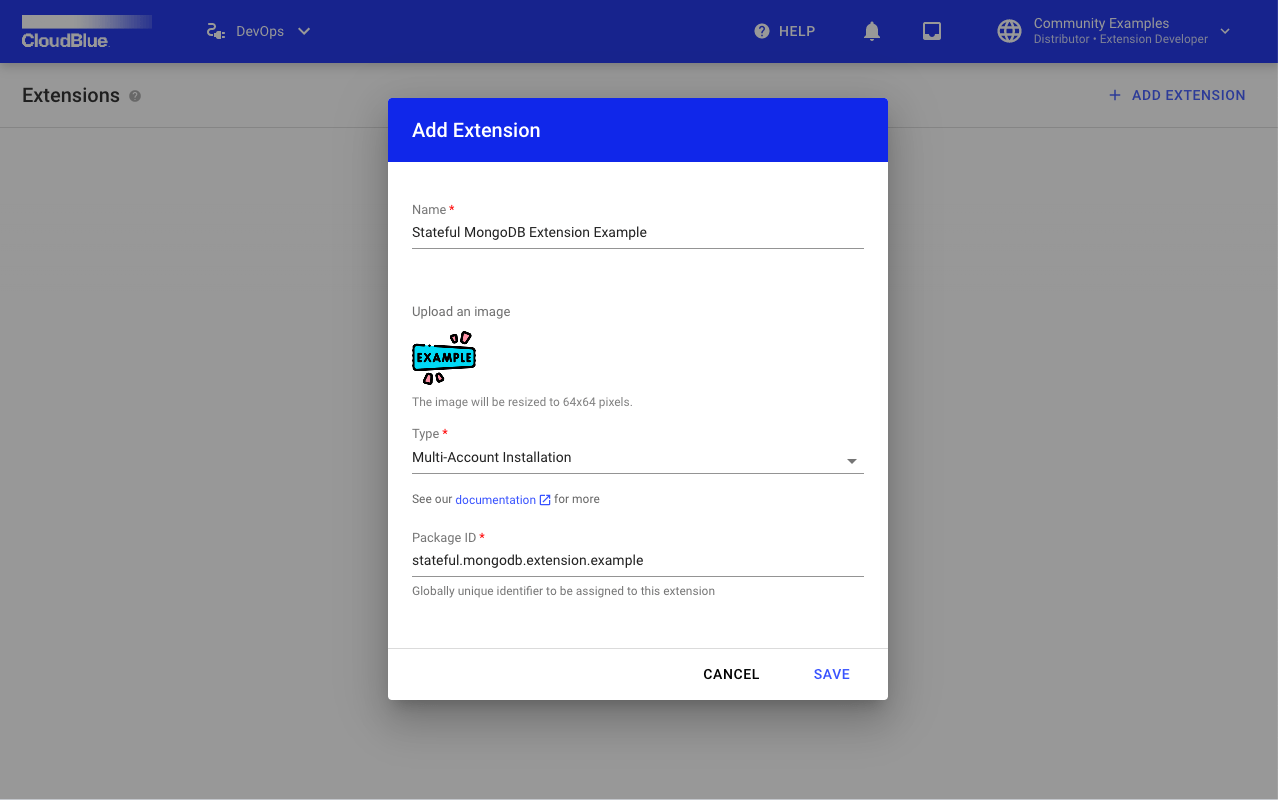
For example, use your distributor Connect account to create a Stateful MongoDB Extension Example of the “Multi-Account Installation” type as demonstrated below:
In addition, the following key data is provided within the Connect Command Line Interface (CCLI) configuration:
The list below provides examples of only generic key-value pairs and does not include account specific values, which should be populated accordingly (e.g., Configuration of APIKey, Environment ID, and so on).
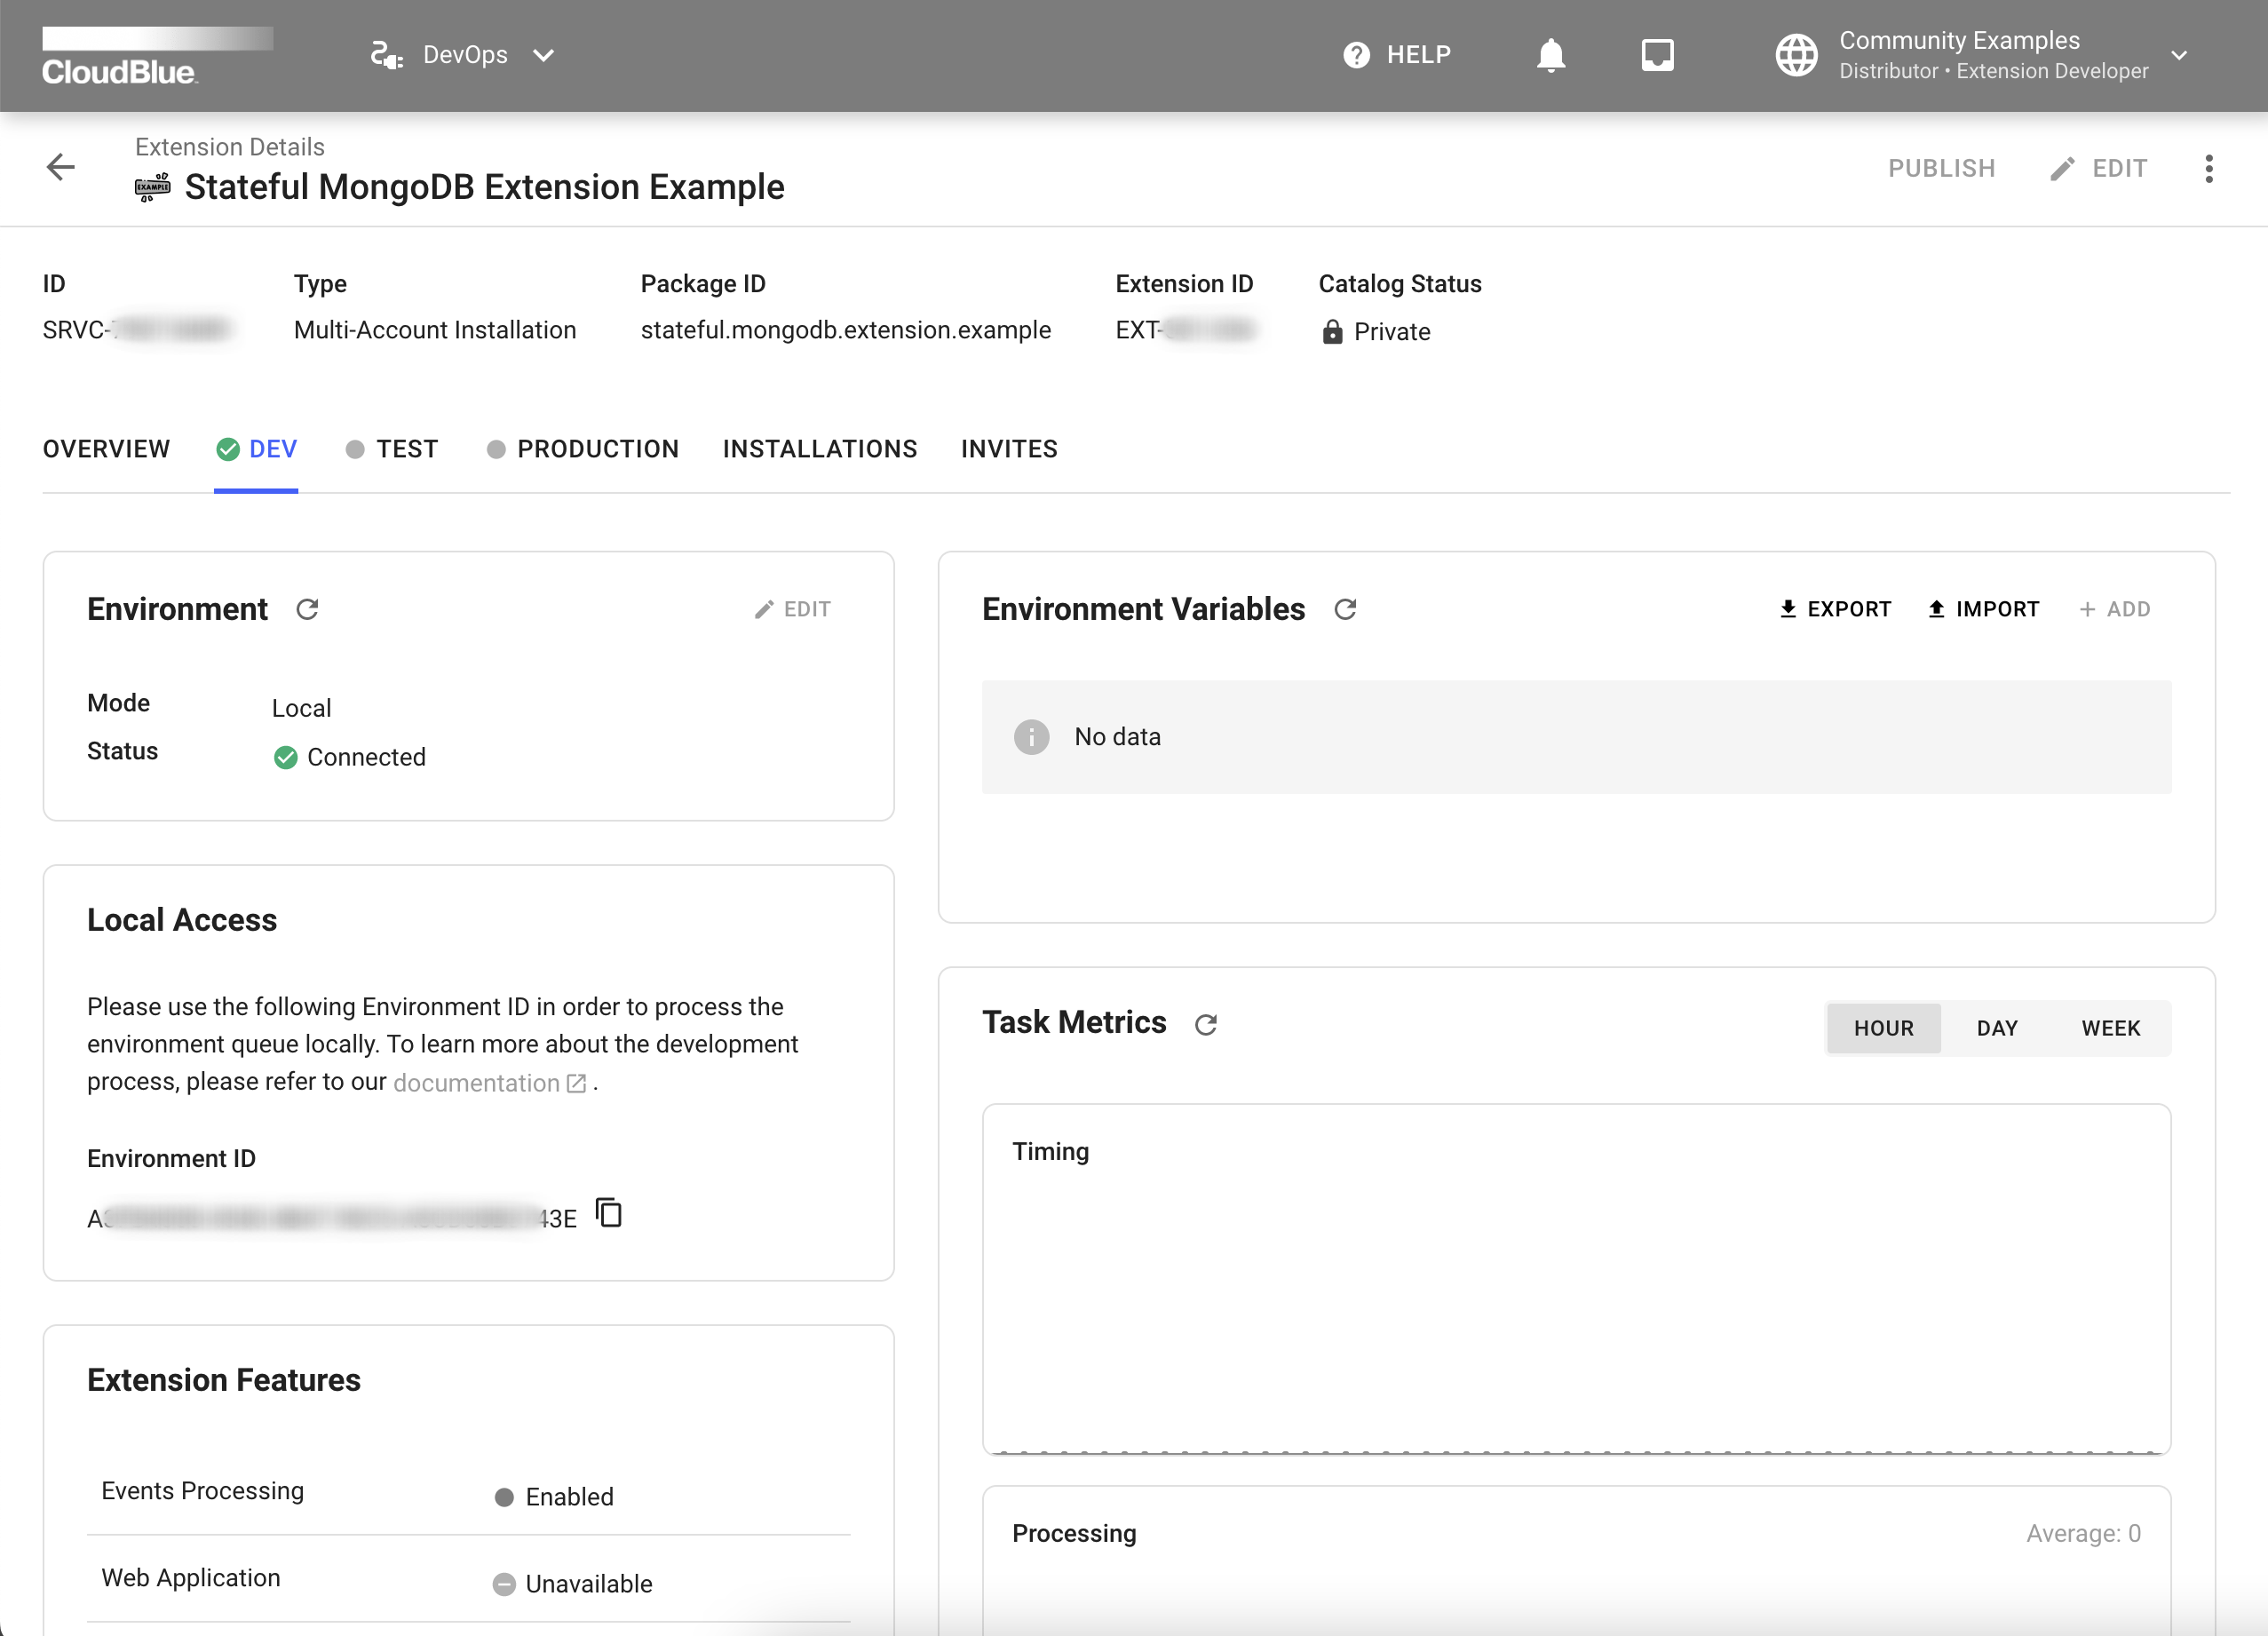
For this example, a Local DEV environment will be used to deploy an extension. Once your project is successfully configured and deployed locally, CloudBlue Connect® will provide the following interface for your extension:
To verify that your local environment is working correctly, create a Test Subscription via the portal interface (as described in the Subscription Creation article). If a Distributor Account is used, ensure that a valid Partner Product from Vendor Account is listed in the existing Marketplace, as it is required for Subscription creation. In case of an issue with these operations, please refer to the following Distributor Tutorial and Vendor Tutorial.
Once a subscription is created, the system will provide logs that are similar to the following messages:
ext_dev  | 2023-01-01 DEBUG    Received message: Message(
...
ext_dev  | 2023-01-01 INFO     Result for task has been sent.
Therefore, it is the time to jump to the second step, which showcases how to prepare an external storage (in this case, MongoDB).
The following demonstrates how to prepare an external storage that will be used by our Extension project to store required data permanently. Any type of supported third-party storage can be used for an extension project. However, this tutorial showcases how to work with the MongoDB NoSQL storage for the following reasons:
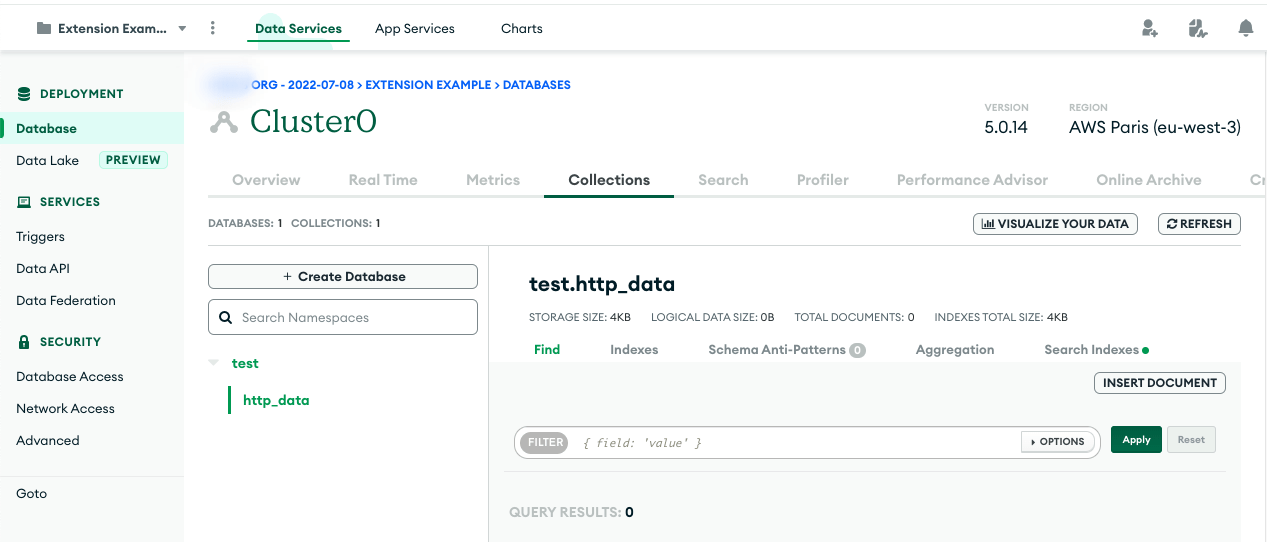
Initially, the MongoDB Atlas platform requires to create an Organization with a Project, a free M0 Cluster, a Database, and a Collection. For example, we can create a test DB with http_data collection in Cluster0 of Extension Example project. The following screenshot illustrates and summarizes this example:
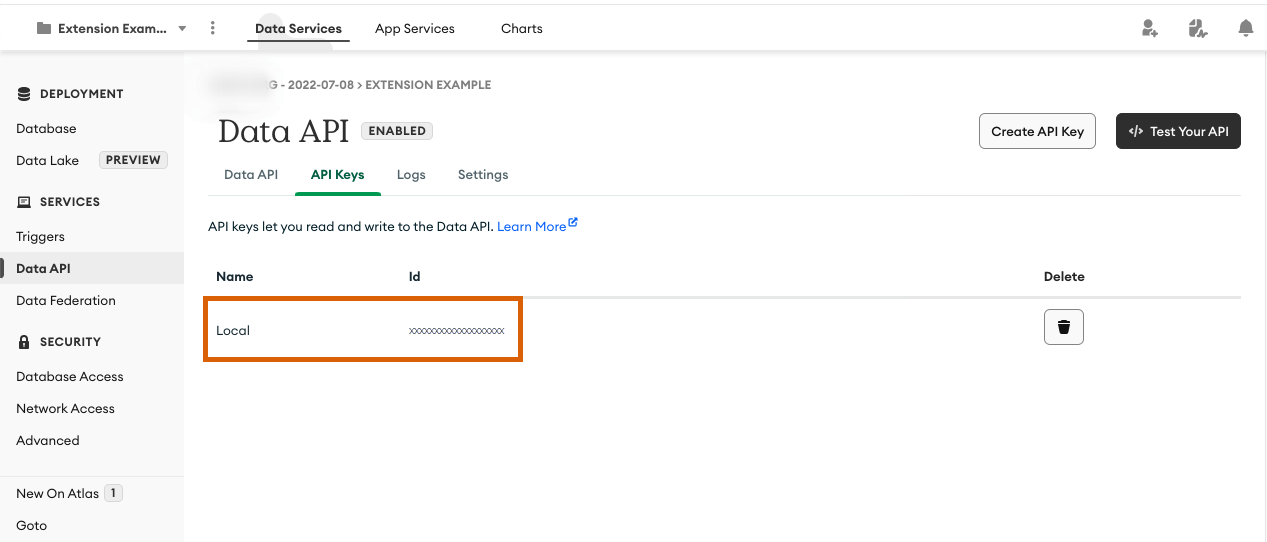
Next, for the simplest high-level integration option, you can use MongoDB Atlas HTTP Data API. To do that, your created Cluster should be connected with Read and Write Access in Data API section of Atlas Portal. Therefore, a related API Key will be created that is demonstrated below:
Finally, make sure that your current development location is whitelisted in the Network Access section of the Atlas portal. In case all preparations are done and successful, get ready to jump to the integration part!
The most secure way to provide environment configuration data to the Extension Project is to use Environment Variables. These variables will be used to propagate DB configuration to the running extension instance. Therefore, the following key value pairs are required (values should be copied from MongoDB Atlas portal that are configured in the previous section of this article):
The following demonstrates the Connect interface with added variables:
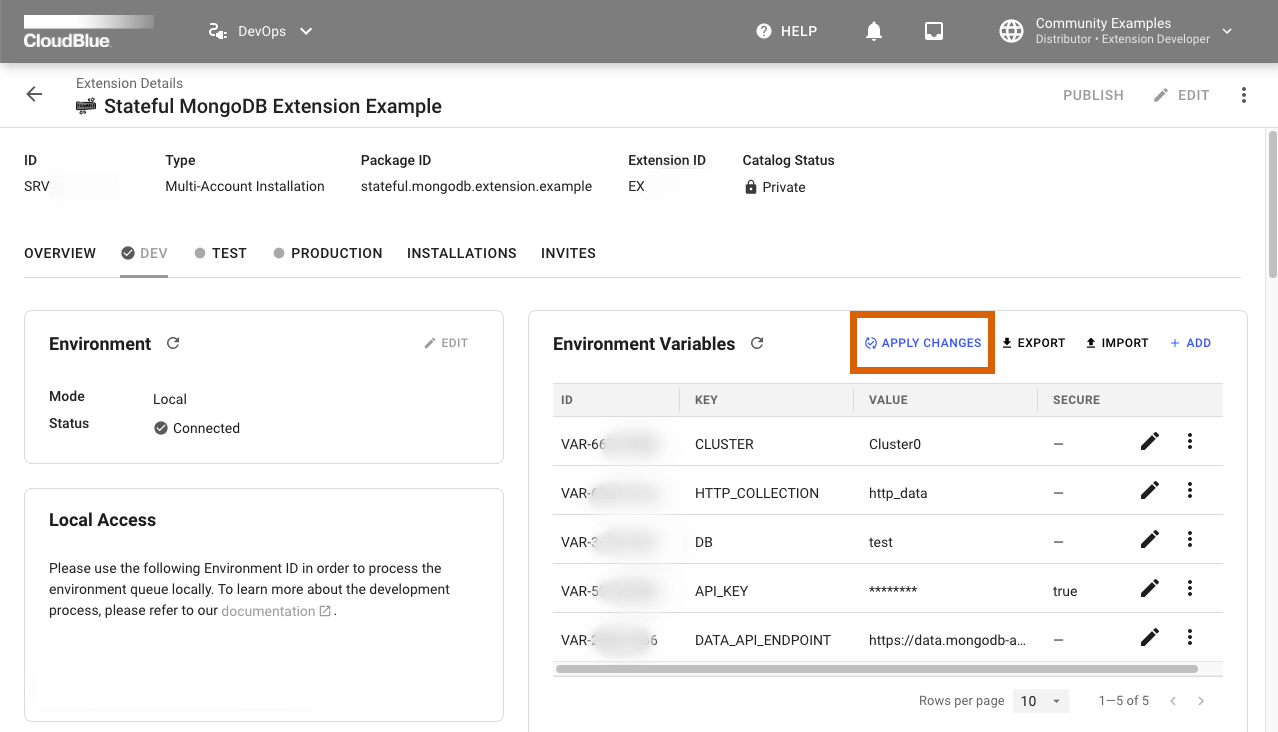
It is important to highlight that configuration changes should be manually applied to the local running installation by using the Apply Changes button.
If this operation is successful, the following logs will appear on the console:
ext_dev | 2023-01-01 INFO Extension configuration has been updated.Your configuration should be applied, but nothing is using these environment values by default. Thus, it is required to adjust the code to be able to store data persistently in your storage. For example, a new DB record can be created for each registered Subscription Event. To achieve that, events.py should be modified and your docker container should be reloaded to pick up the updated code:
# -*- coding: utf-8 -*-
#
# Copyright (c) 2023, CloudBlue Connect®
# All rights reserved.
#
import httpx

from connect.eaas.core.decorators import (
    event,
)
from connect.eaas.core.extension import EventsApplicationBase
from connect.eaas.core.responses import (
    BackgroundResponse,
)


class ConnectExtensionMongodbExampleEventsApplication(EventsApplicationBase):
    @event(
        'asset_purchase_request_processing',
        statuses=[
            'pending', 'approved', 'failed',
            'inquiring', 'scheduled', 'revoking',
            'revoked',
        ],
    )
    async def handle_asset_purchase_request_processing(self, request):
        await self.save_subscription_event_via_http_api_to_mongo_db(request)

        return BackgroundResponse.done()

    async def save_subscription_event_via_http_api_to_mongo_db(self, request):
        base_api_endpoint = self.config['DATA_API_ENDPOINT']

        async with httpx.AsyncClient() as client:
            r = await client.post(
                f'{base_api_endpoint}/action/insertOne',
                headers={
                    'Content-Type': 'application/json',
                    'Access-Control-Request-Headers': '*',
                    'api-key': self.config['API_KEY'],
                },
                json={
                    'collection': self.config['HTTP_COLLECTION'],
                    'database': self.config['DB'],
                    'dataSource': self.config['CLUSTER'],
                    'document': request,
                },
            )
            self.logger.info(r)
For manual testing, you can once again create a Test Subscription by using the Connect interface as described in the Verification abstract of Getting started. If everything is configured correctly, the following log would appear in the console:
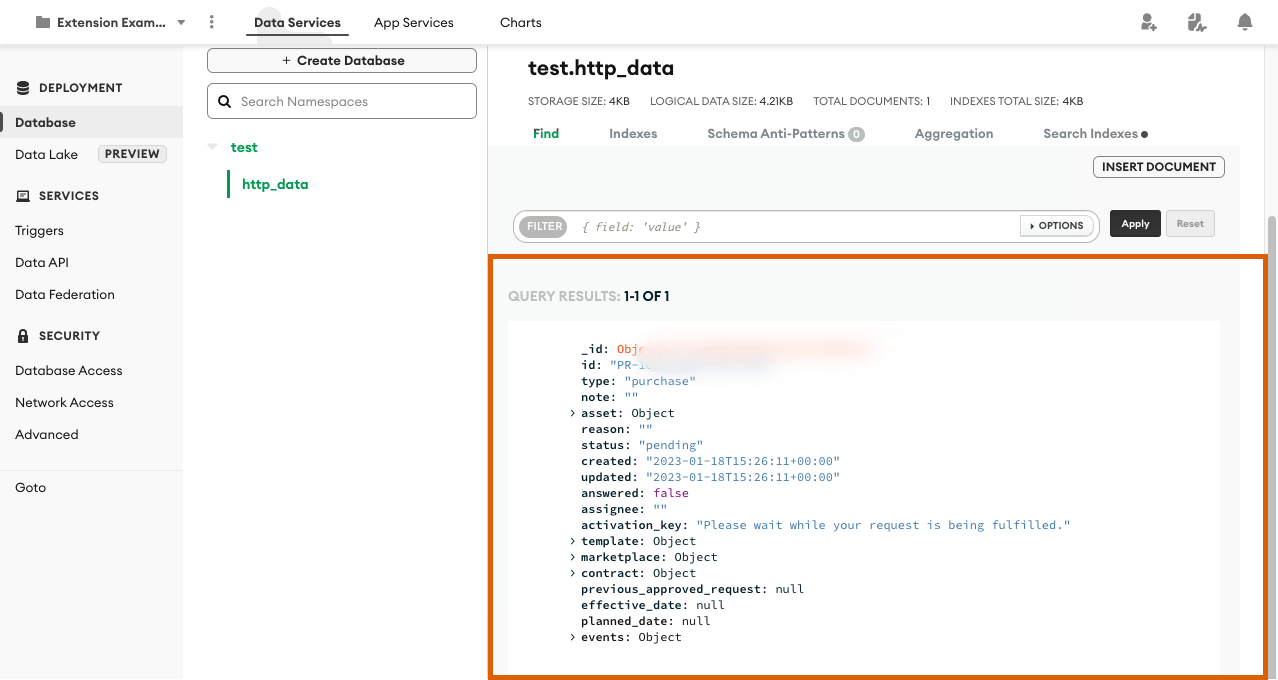
ext_dev | 2023-01-01 INFO <Response [201 Created]>The message above shows that a new data record has been successfully created and persisted within our MongoDB storage. Thus, the partial goal of this tutorial has been successfully achieved.
To verify the results, representation of the aforementioned record can be found via the MongoDB Atlas interface within the operated http_data collection:
To sum up the abstract, the following high-level approach can be easily used to create powerful Stateful Extensions. While this tutorial highlighted only one operation type for a specific DB engine platform, this concept works in the same manner for other engine types or operations within the limitations of these platforms and their APIs.
While the high-level integration via HTTP API can be convenient and sufficient for a large number of created applications, the low-level integration via driver and DB API might also be essential for your project.
The following provides an example of low-level integration. This part of tutorial might be more technical, but the general integration pattern remains the same as described in High Level Integration.
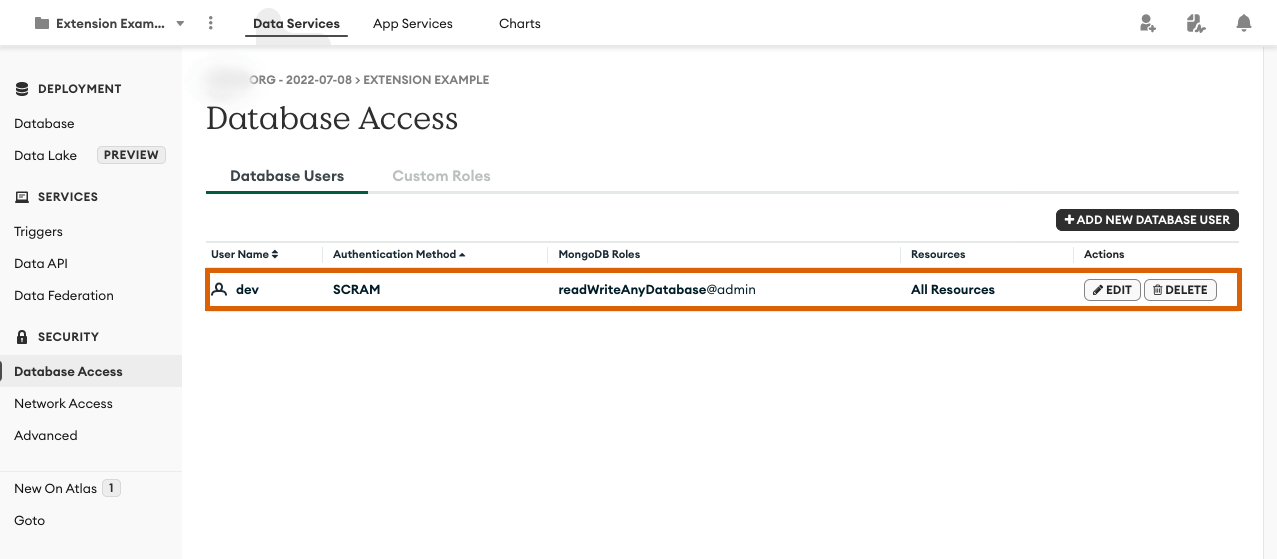
The first part of configuration also starts with the storage preparation. which in this case is MongoDB Atlas. To provide the write access to your database, it is required to have at least one Database User with ReadWrite role and enabled permissions in the Database Access section. Make sure to verify that such a user exists or create a new one if this step has been omitted in the previous high-level integration tutorial. A created dev database user with all required permissions is demonstrated below:
While the existing http_data Collection can be used to store the data, a new collection driver_data will be created in the same Cluster and in the same DB.
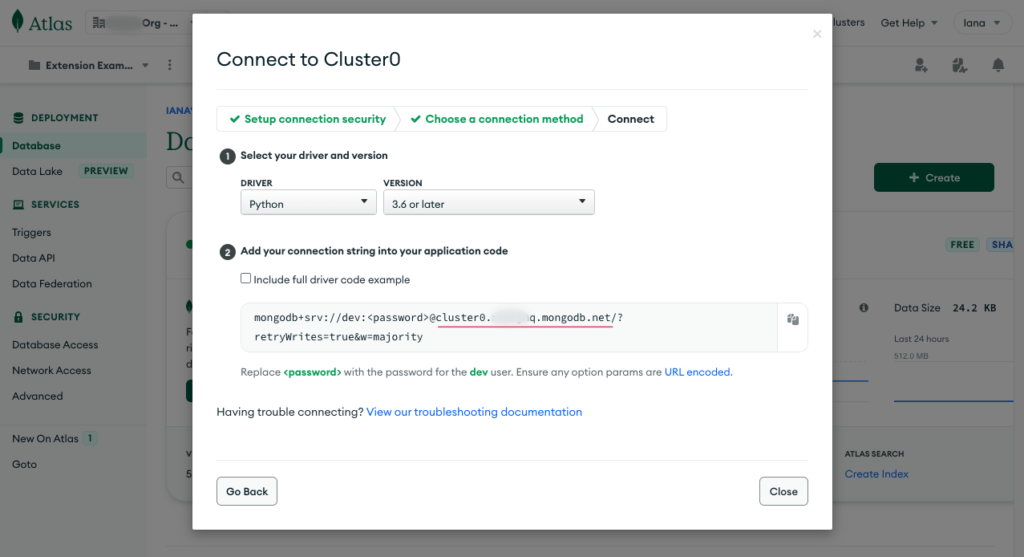
The driver will be provided with a Connection string, which can be obtained from Cluster Connect section of the Atlas portal. It represents the same string for different types of drivers, but the following configuration can be used as an example:
Next, the following environment variables should be added to your extension project via the Connect portal:

Furthermore, the MongoDB driver will be installed locally to support any DB operations. This tutorial utilizes the official asynchronous MongoDB Motor driver. In order to include the required package into the project, make sure to modify the [tool.poetry.dependencies] section of pyproject.toml:
[tool.poetry.dependencies]
python = ">=3.8,<4"
connect-eaas-core = ">=26.13,<27"
motor = "3.*"
Local docker image should be rebuilt and restarted to install the new dependencies and pick up the updated Environment Variables with the corresponding docker command as demonstrated below:
docker compose build && docker compose up connect-extension-mongodb-example_devThe following showcases a code that is used to demonstrate how to work with low-level integration and the MongoDB motor asynchronous driver.
First, define new imports by using the code below:
import urllib.parse

import motor.motor_asyncio
Second, create a new function in the existing Application class. This function stores a single document in your database:
async def save_subscription_event_via_motor_to_mongo_db(self, request):
    db_host = self.config['DB_HOST']
    db_user = urllib.parse.quote(self.config['DB_USER'])
    db_password = urllib.parse.quote(self.config['DB_PASSWORD'])

    connection_str = f'mongodb+srv://{db_user}:{db_password}@{db_host}/'
    client = motor.motor_asyncio.AsyncIOMotorClient(
        connection_str, serverSelectionTimeoutMS=5000,
    )

    db = client[self.config['DB']]
    collection = db[self.config['DRIVER_COLLECTION']]
    r = await collection.insert_one(request)

    self.logger.info(r)
Finally, your created function should be called in the lifecycle of the event:
async def handle_asset_purchase_request_processing(self, request):
    ...
    await self.save_subscription_event_via_motor_to_mongo_db(request)
    ...
As a result, the demo code for your project should be defined successfully. In case you want to expand your project or play around with potential capabilities of the driver, refer to the official Motor tutorial.
Once the updated code is deployed into your docker container, make sure to test out your new functionality. Start your manual testing by creating another Test Subscription via the Connect UI as described in the Verification abstract of Getting started. If your extension is configured correctly, the following log will appear in the console:
ext_dev | 2023-01-01 INFO <pymongo.results.InsertOneResult...The message above shows that a new data record has been successfully created and persisted within our MongoDB storage. Thus, all the goals of this tutorial have been successfully achieved.
To verify the results, representation of the aforementioned record can be found via the MongoDB Atlas interface within the operated driver_data collection:

By completing this tutorial, you have successfully created a stateful DevOps extension project, which is able to store data persistently in the external storage. The Extension Framework that is provided by CloudBlue Connect® can be used to work with High-Level HTTP API and Low-Level Driver integrations. This enables to quickly and easily develop applications of any size and data complexity.
If there are any questions related to the scope of this tutorial, please refer to the issues section of the example repository in GitHub.