Access the Notifications menu to customize and manage email notifications that are sent to your specified recipients. The provided notification options can be increasingly important in case submitted notifications should match the identity of your organization and in case it is necessary to provide rules that the system should follow for sending required emails. Consequently, this section is used to customize templates for your notifications, manage rules for your notification mailing, and disable unwanted notifications completely.
The following introduces available user interface operations within the Notification section of the Account module.
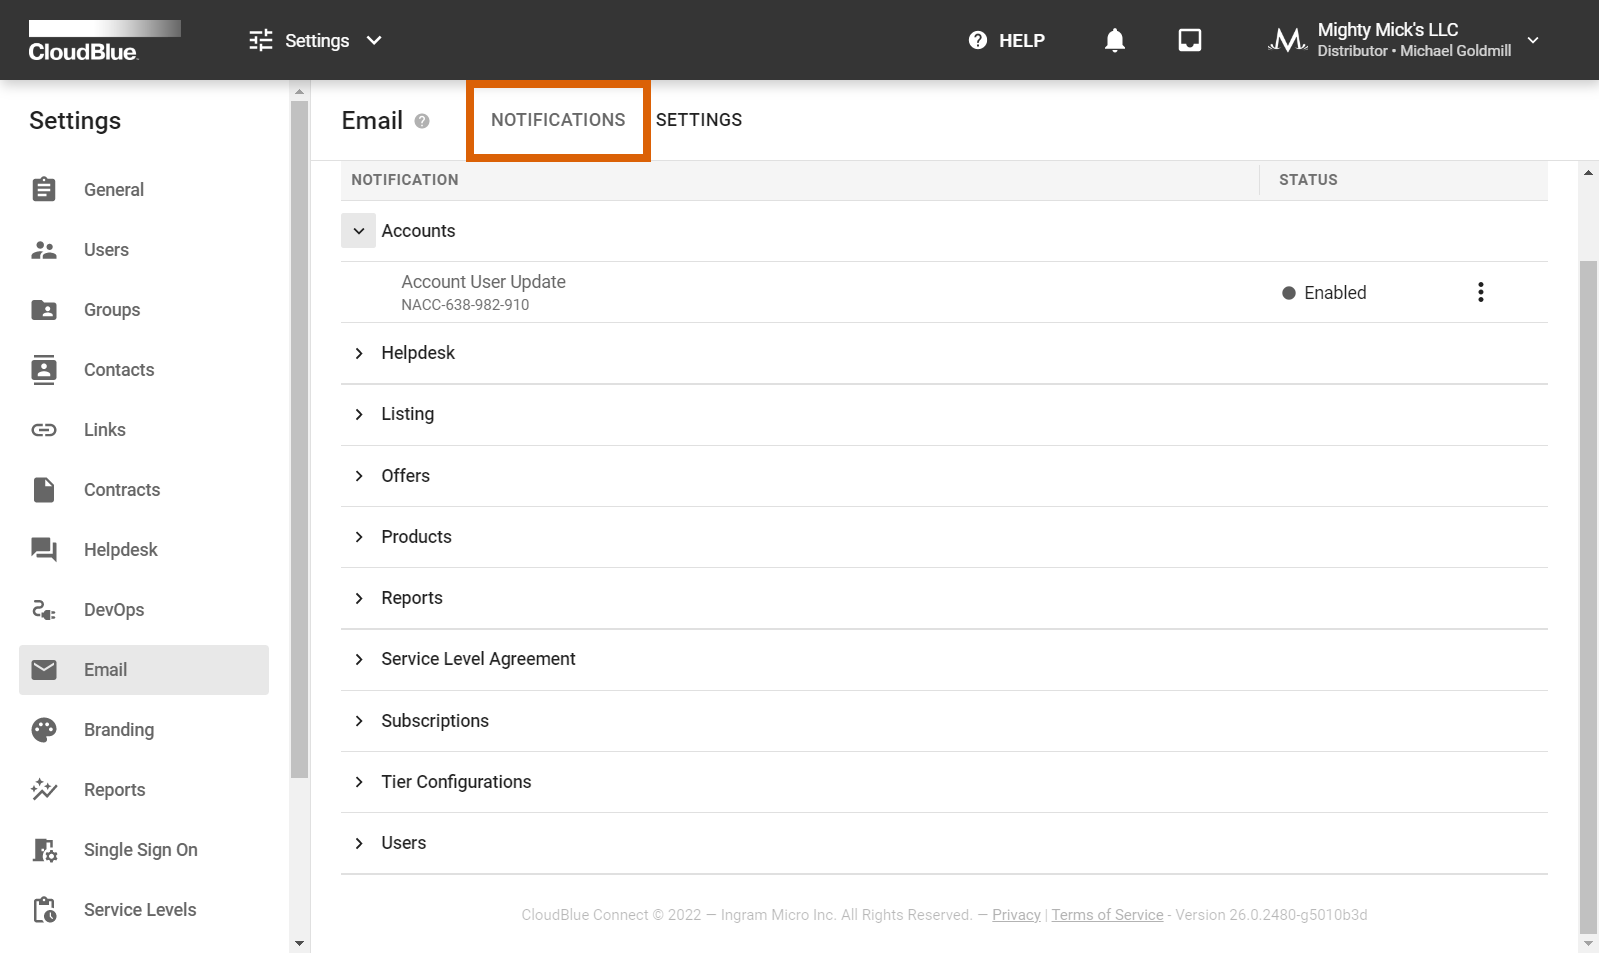
Notifications
The Notifications tab provides the email notification types for various events on the CloudBlue Connect® platform. This tab is used to review and manage your email notifications and examine your notification statistics. Namely, the system specifies the number of sent notifications for the last moth and for the present day.
The system also allows enabling and disabling specific notifications by using the vertical ellipsis (⋮) icon and selecting Enable and Disable options. In case your selected email notification is disabled, the system will not provide an email with these notifications.
Note
Certain notifications cannot be disabled since they can be essential for the Connect workflow. Therefore, it is impossible to disable user invitation emails, password reset notifications, and so on. The system will inform you if the selected email notification cannot be disabled.
Manage rules for sending your selected email notification and configure placeholders for your notifications via the Notification Details screen.
Notification Types
By accessing the Notifications tab, the system allows managing the following email notification types:
Account – User Account Update: The system sends User Account Update notifications when new users are invited to your Connect account or removed from your account.
Helpdesk – Case Update: These notifications are sent when new helpdesk cases are created and when your cases are updated. Note that recipients for this notification type are managed only via helpdesk cases.
Listing Update: The system sends these notifications when new listing requests are created and when such requests are updated.
ReportUpdate: These notifications are provided in case new reports are generated and in case your reports are updated.
Service Level Agreement:
Subscription Request Zone Change: The system provides these notifications in case your subscription request is moved to another SLA zone
Tier Config Request Zone Change: Such notifications are provided if a tier config request is moved to another SLA zone.
Subscriptions:
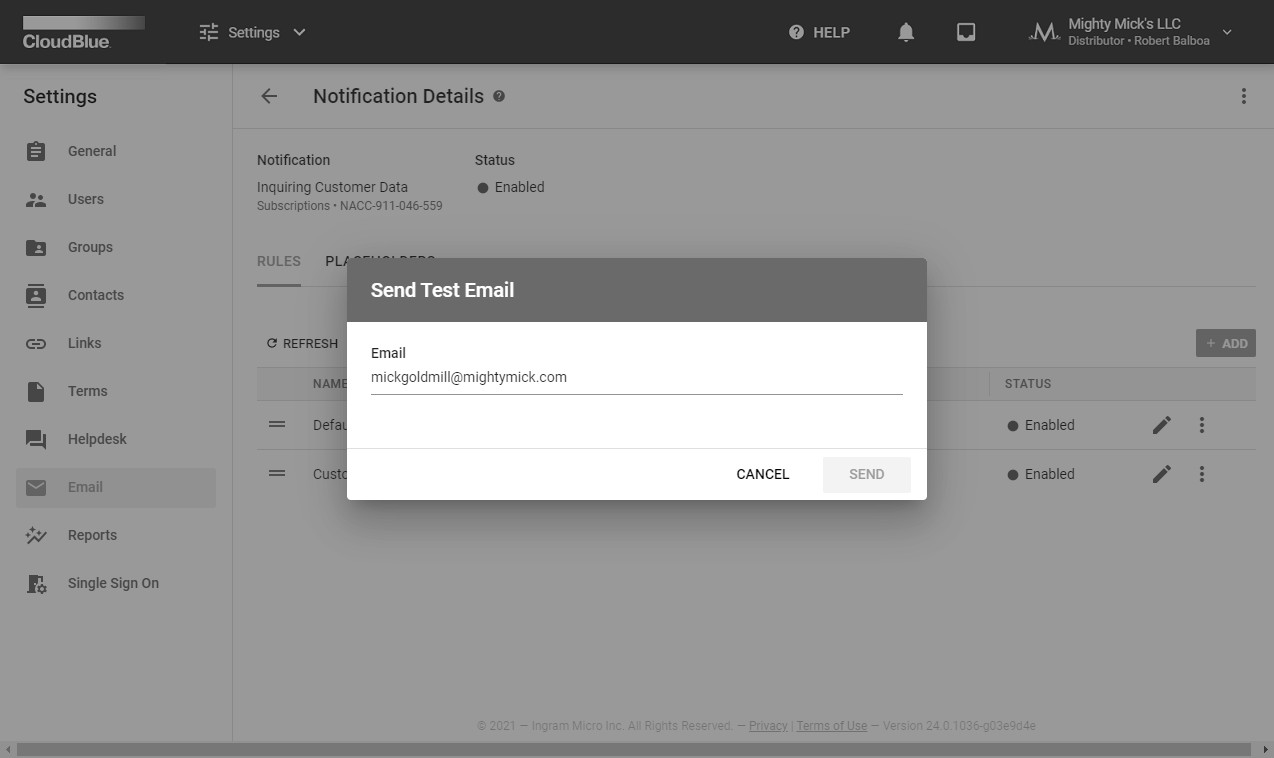
Inquiring Customer Data: The system sends these notifications in case parameter data is inquired to process new subscriptions. Your customer email is used as the default recipient address (e.g., tiers.customer.contact_info.contact.email). Note that the system allows specifying users and groups instead of default recipients. However, selecting users/groups along with default recipients is not allowed.
Subscription Request Update: These notifications are provided in case a new subscription request is generated and when your subscription request status is changed.
Tier Configurations:
Tier Request Update: The system sends these email notifications in case a new tier configuration request is generated and once your existing tier request is updated.
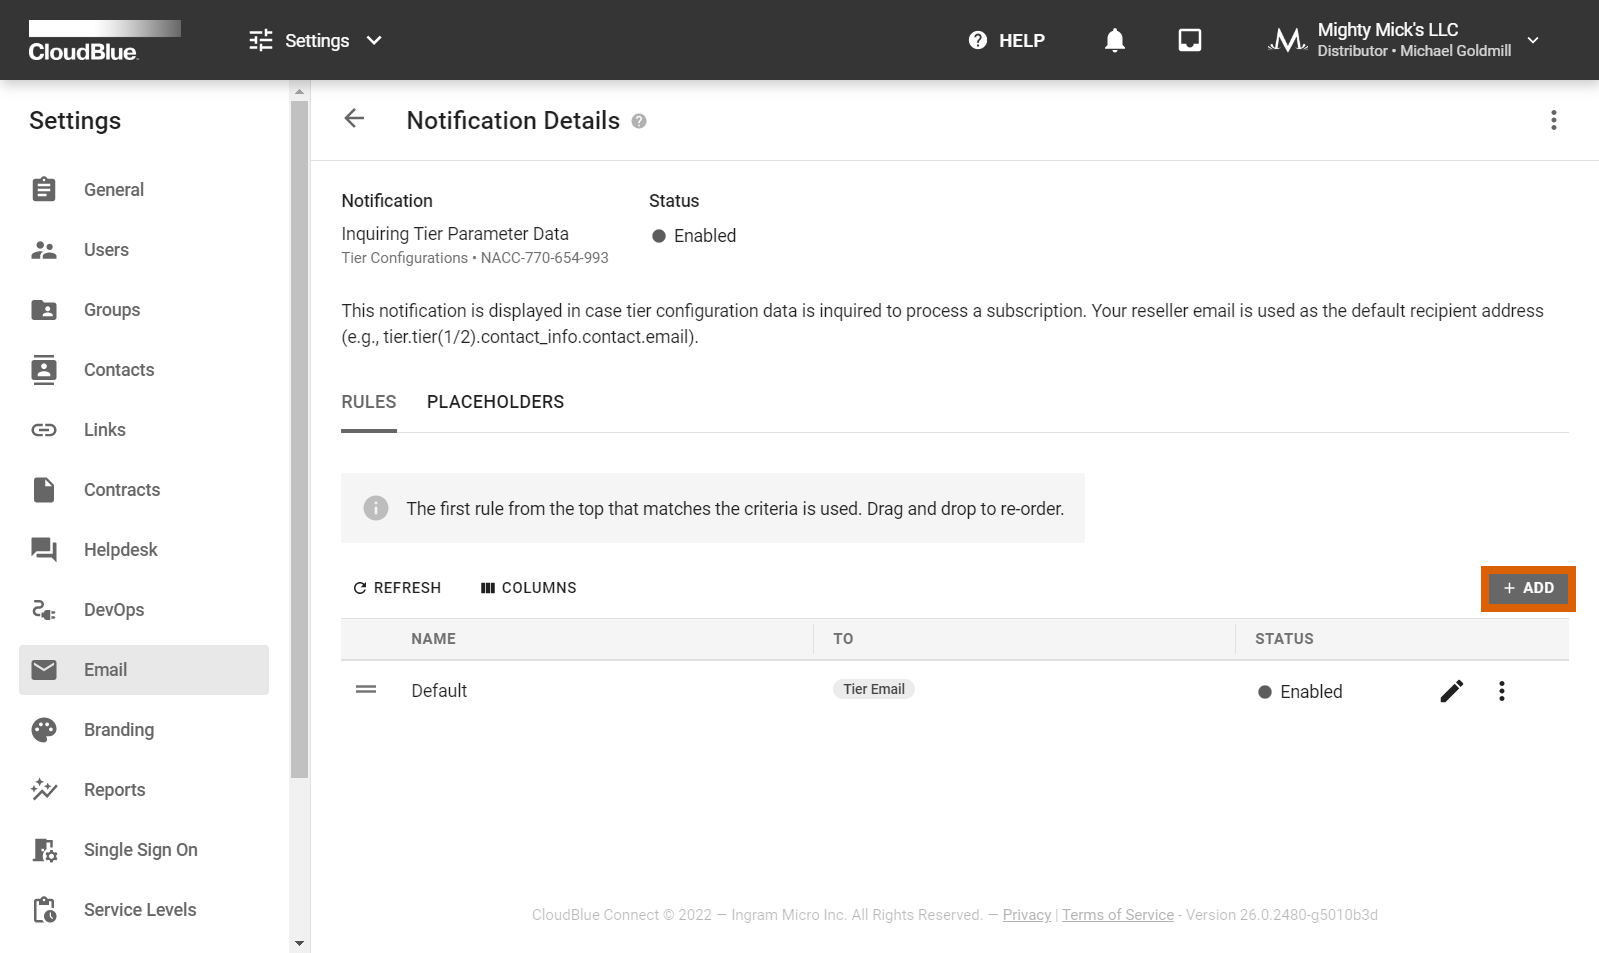
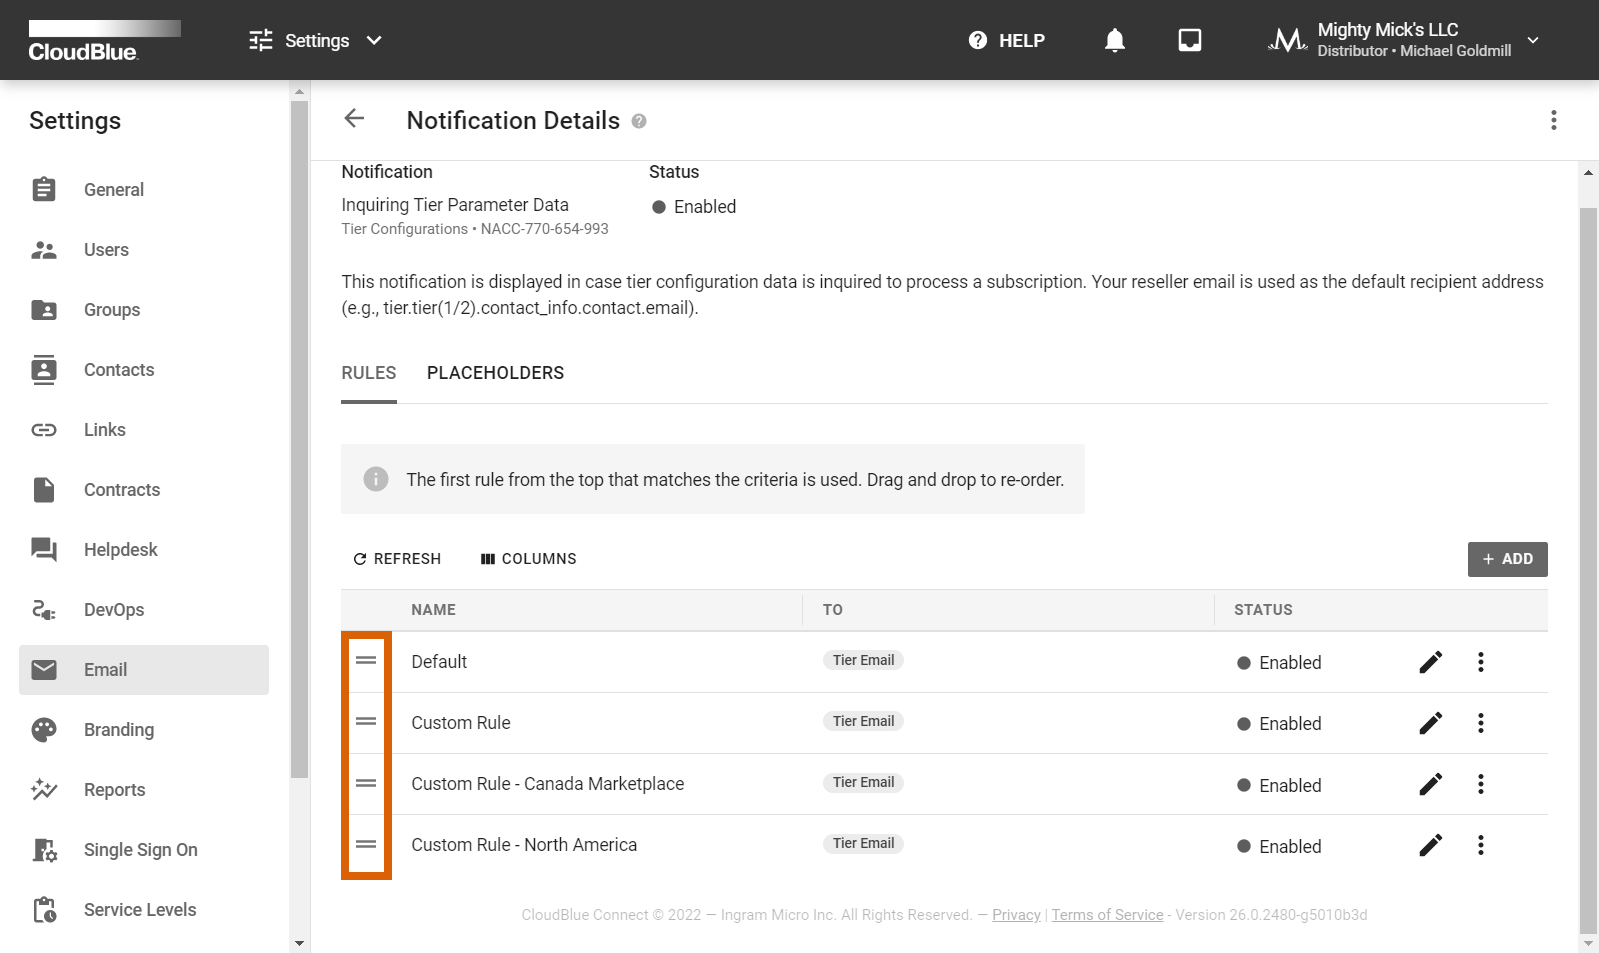
Inquiring Tier Parameter Data: These notifications are provided in case tier configuration data is inquired to process a subscription. Your reseller email is used as the default recipient address (e.g., tier.tier(1/2).contact_info.contact.email). The system allows specifying users and groups instead of default recipients. Note, however, that selecting users/groups along with the default recipients is not allowed.
User:
User Invitation: This email notification is sent to a new user once this user is invited to your Connect account. Note that recipients for this notification type cannot be edited.
Successful Password Reset: This notification is sent to a user that is successfully updated their password. Note that recipients for this notification type cannot be edited.
Password Reset: In case a user of your Connect account wants to reset their password, the system automatically sends this notification to this user. Note that recipients for this notification type cannot be edited.
User Removal: This notification is sent to a user that is removed from your Connect account. Recipients for this notification type cannot be edited.
Triggered externally
Send email via API: This notification type is used to send custom email notifications. After you configure your custom notification template, you need to pass variables and the rule id visible under the template to the Notifications API. Custom Extensions built using the DevOps module can also send email notifications to customers based on custom templates.
Information
You can also use the Notifications API to send plain custom email notifications based on the default email template with only the subject and content passed. In this case, you do not need to configure the template using the Connect UI.
Click on your required notification type from the provided list to access the Notifications Details screen and manage your selected notifications as described below.
Notification Details
This Notification Details screen provides general information on your selected email notification template. This includes your selected notification name, notification description, and associated module. Disable or enable your selected notification by clicking on the vertical ellipsis (⋮) icon at the top-right corner of the screen.
Notification Details also allows defining and managing your rules and accessing placeholders as described below.
Rules
Access the Rules tab to define your rules for sending your selected email notifications. Namely, rules represent your selected conditions, required recipients, template configurations that the system checks up and applies before sending required emails.
Create a new rule by clicking the Add button on the provided user interface. Thereafter, use the following form to configure your rule:
Note
Creating new rules is available for Inquiring Customer Data, Inquiring Tier Parameter Data, and Triggered Externally email notifications.
Name: Enter a name for your new custom rule.
Condition: Use the provided interface to specify required filters that serve as conditions for submitting your email notifications. Note that available filters vary depending on your selected template.
Recipients: Select users, groups or enter required email addresses for your notification mailing.
Template: Change your email template by using the provided fields. The system also allows previewing your template by using the corresponding Preview button on the interface.
Subject: Enter a code for your email subject.
Body: Provide HTML and CSS codes for your email body.
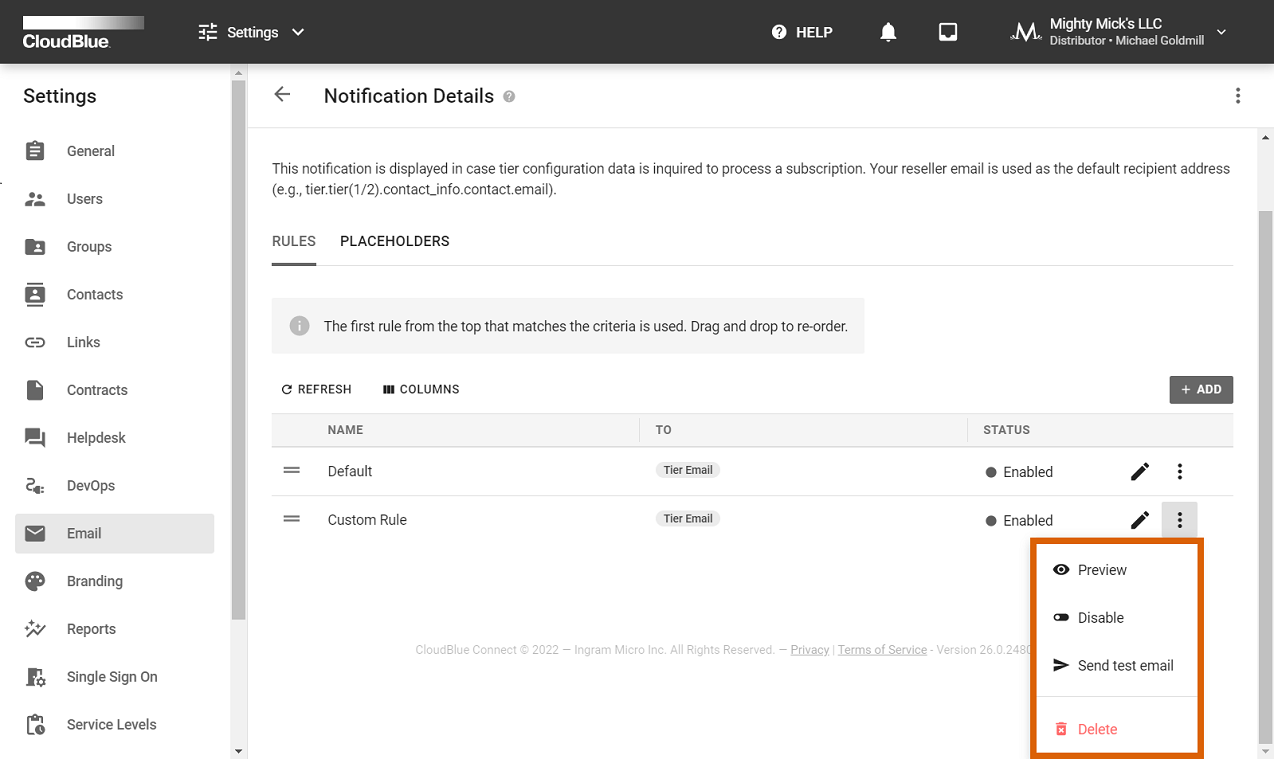
Click the Add button to save your email notification rule. Note that the system allows disabling/ enabling or removing by using the vertical ellipsis (⋮) icon. Select the Preview option by clicking the ellipsis icon to preview the specified template for your added rule. Furthermore, the system allows previewing your email notification by sending a test email to your specified address via the corresponding Send Test Email option.
Important
In case an email address of your specified recipient is blocked by the system, this recipient will not receive an email notification. Thus, it is necessary to contact CloudBlue Support to unblock this email address.
Changing Rules Order
Use the provided order icons to change the order of your added rules. It is important to note that the first rule from the top that matches the criteria is used. Namely, in case multiple rules with similar conditions are created, the system automatically follows the first enabled rule from the top of the list.
Note that new created rules are Disabled by default. Therefore, make sure to enable required rules before finalizing your rules configuration.
Placeholders
The Placeholders tab is used to access the placeholder data for your selected email notification. The provided data grid includes your available placeholders, sample values and description for each placeholder.
The system also allows downloading the provided placeholder data by using the Download button on the right-hand side of the screen.
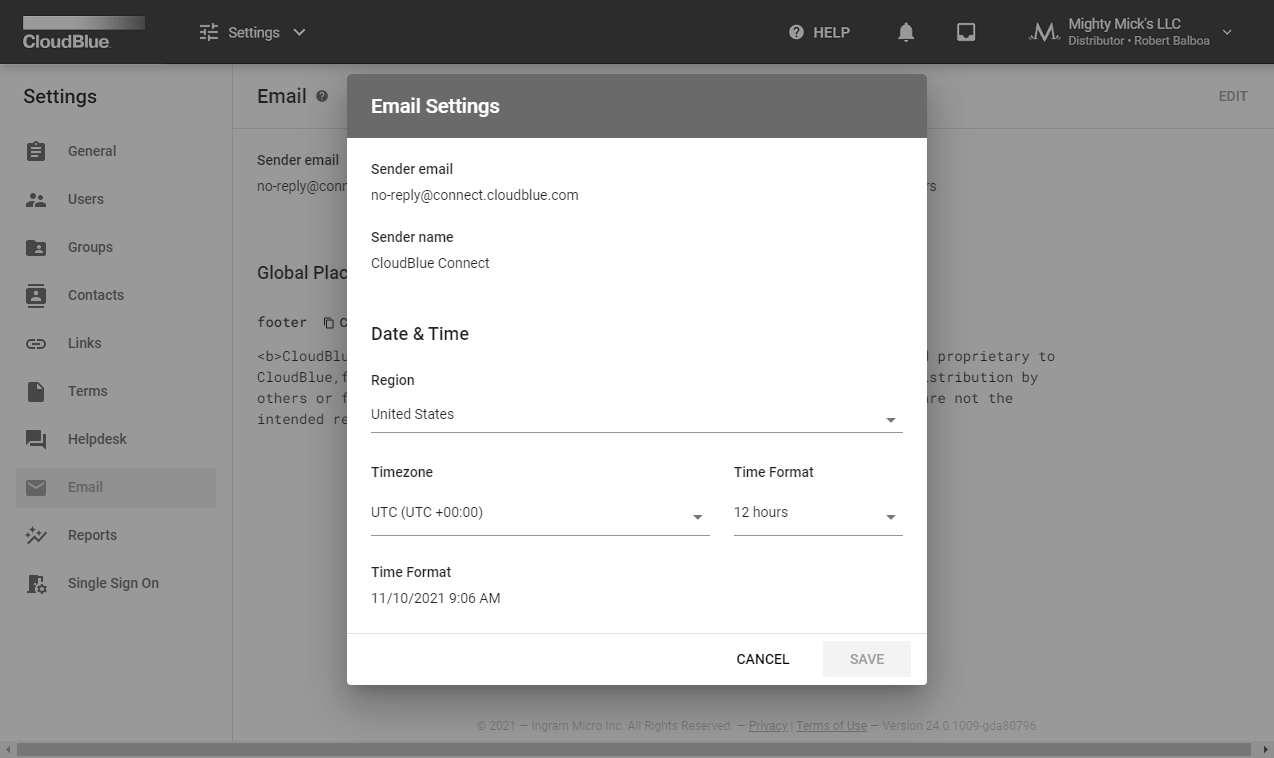
Settings
The Settings tab allows accessing global data and global configurations for your email notifications. Namely, this include your global placeholder data, sender email, sender name, time-zone, region and so on.
Global placeholder, as the name implies, provides your footer placeholder that is applicable to all email notifications. Use the provided Copy button to copy the provided placeholder data.
Click the Edit button at the top-right corner of the Settings screen to access the sender data and date/time options:
Sender email: Displays your email address that will be used for all email notifications.
Sender name: Provides your company name that will be used for notification mailing.
Date & Time: The following options represent date and time settings:
Region: Select your region from the provided list.
Time-zone: Use this option to specify your time zone.
Time Format: Choose one of the provided time formats (24 or 12 hours).
Once your region, time-zone and time format configuration is complete, click the Save button to save your adjustments.