The Forms Management module enables Distributors to create and manage custom forms on the CloudBlue Connect® platform. These forms are used to collect additional information from Vendors to perform the following operations:
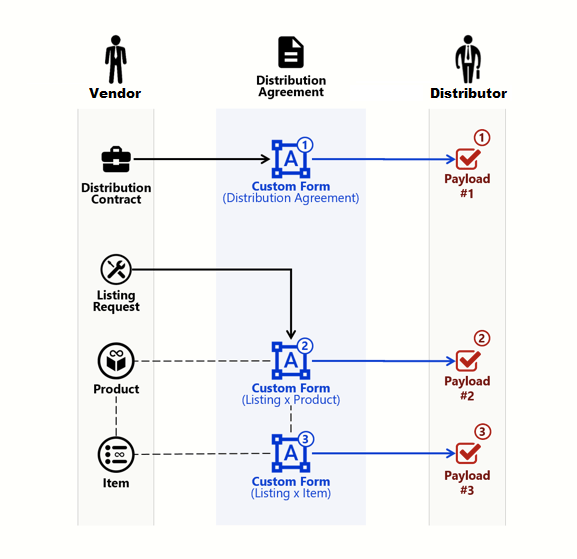
Custom forms can be especially helpful for acquiring necessary information for various business scenarios. Example use cases include, but not limited to the following scenarios:
The following provides instructions on how to create and attach custom forms on the Connect platform.
Create a custom form on the Connect platform by following the steps below.
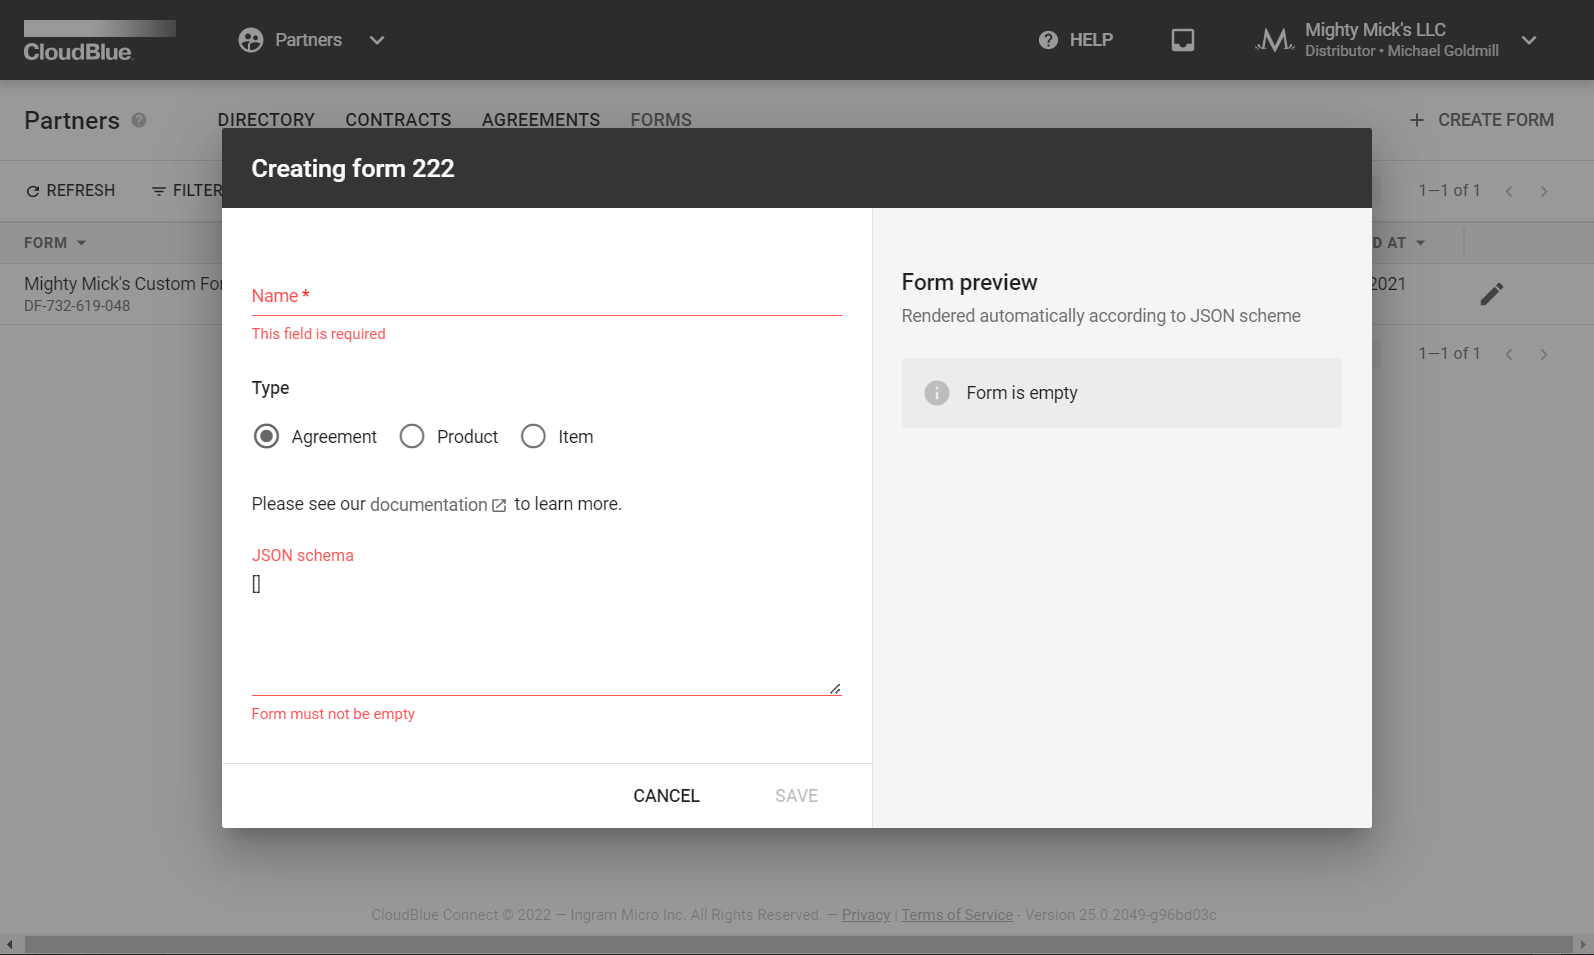
Click the Create Form button from the Forms module.

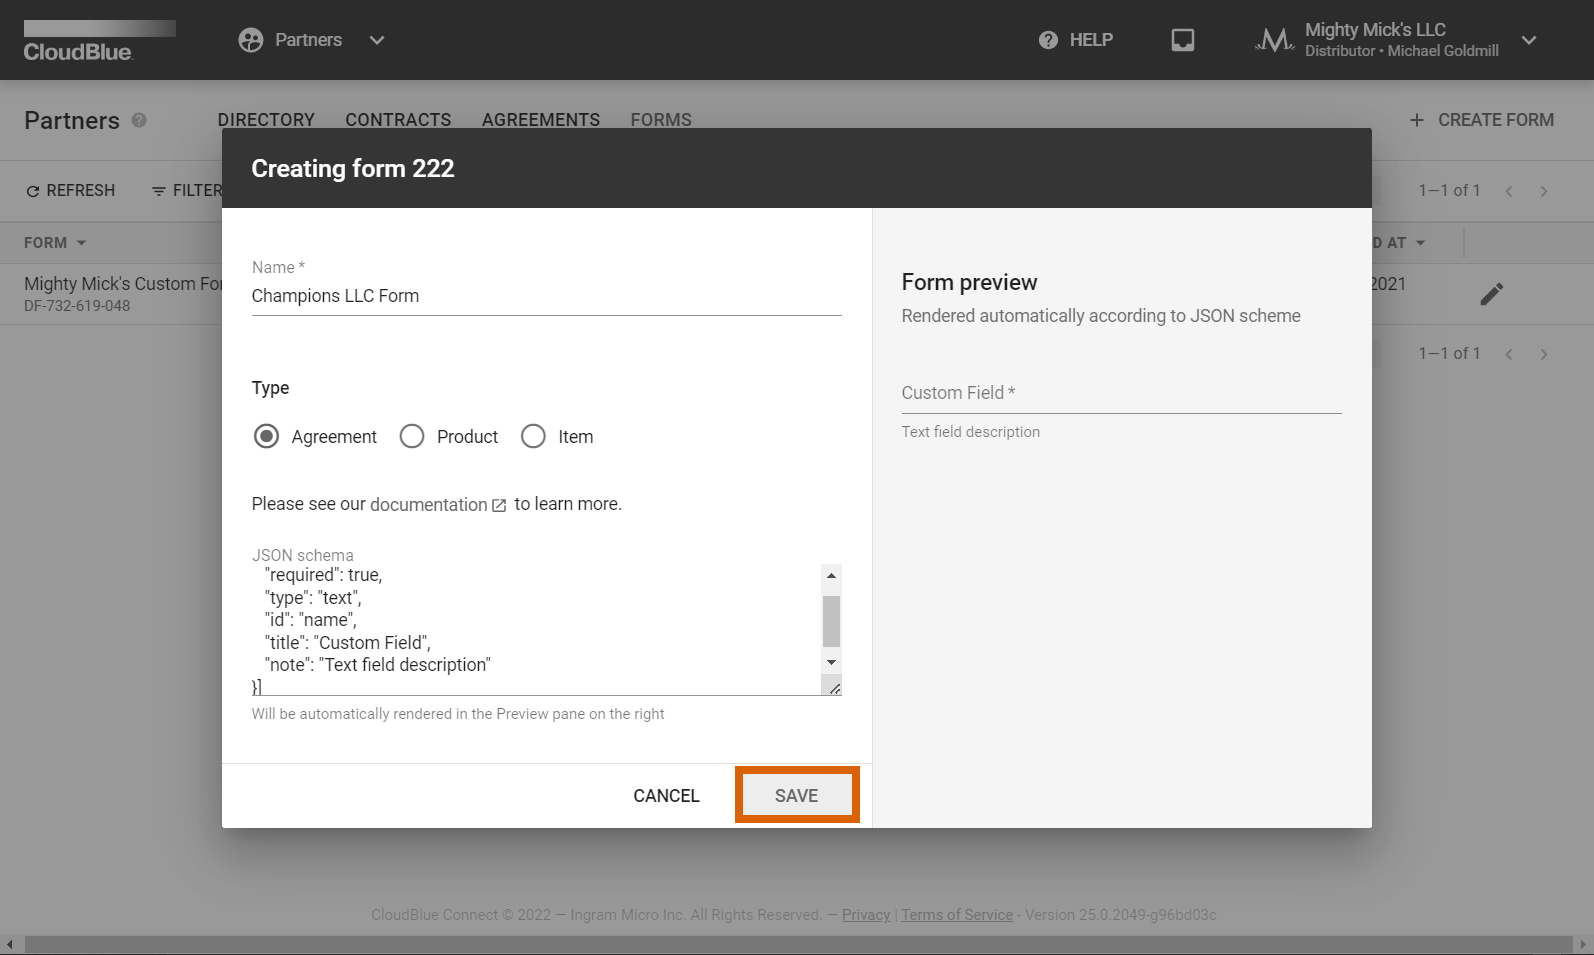
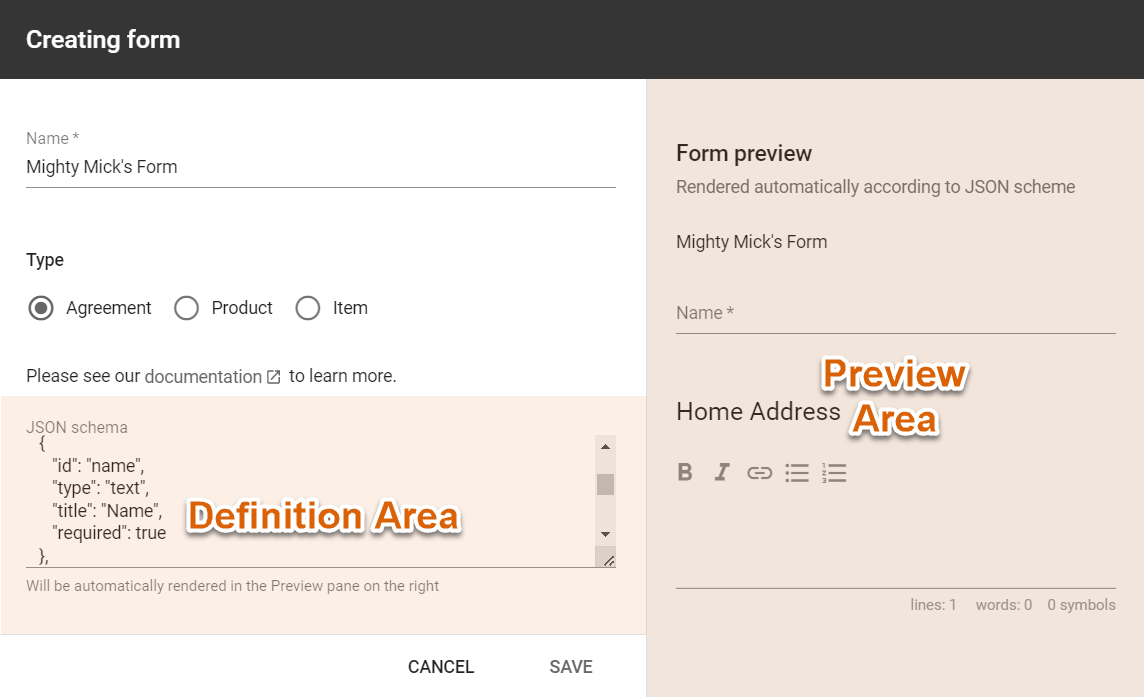
Define your custom form within the following pop-up window:
Click the Save button to save your defined custom form.
Therefore, your defined custom form will be successfully created and saved within the Forms module.
Once a custom form is successfully saved, Distributors can attach custom forms within a created Distribution Agreement.
The following steps showcase how to successfully attach your created form to your distribution agreement.
Click on your distribution agreement name from the Agreements tab of the Partners module to access the distribution agreement details screen.

Alternatively, click on your distribution agreement name under Distribution Agreements from the program agreement details.
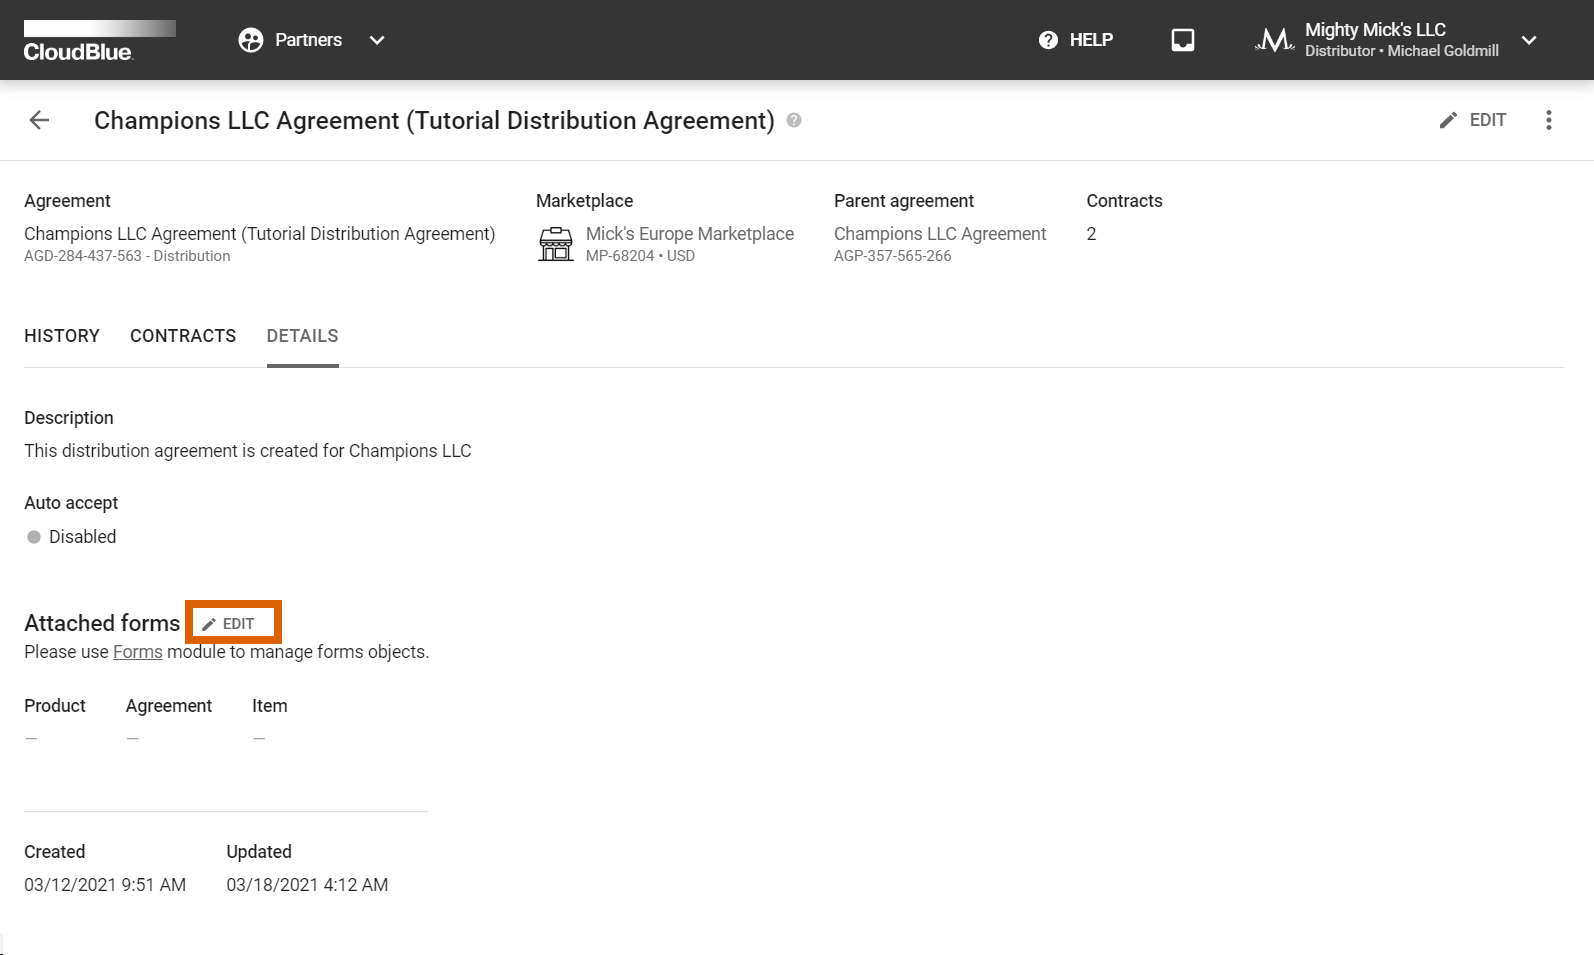
Switch to the Details tab button upon accessing your distribution agreement.
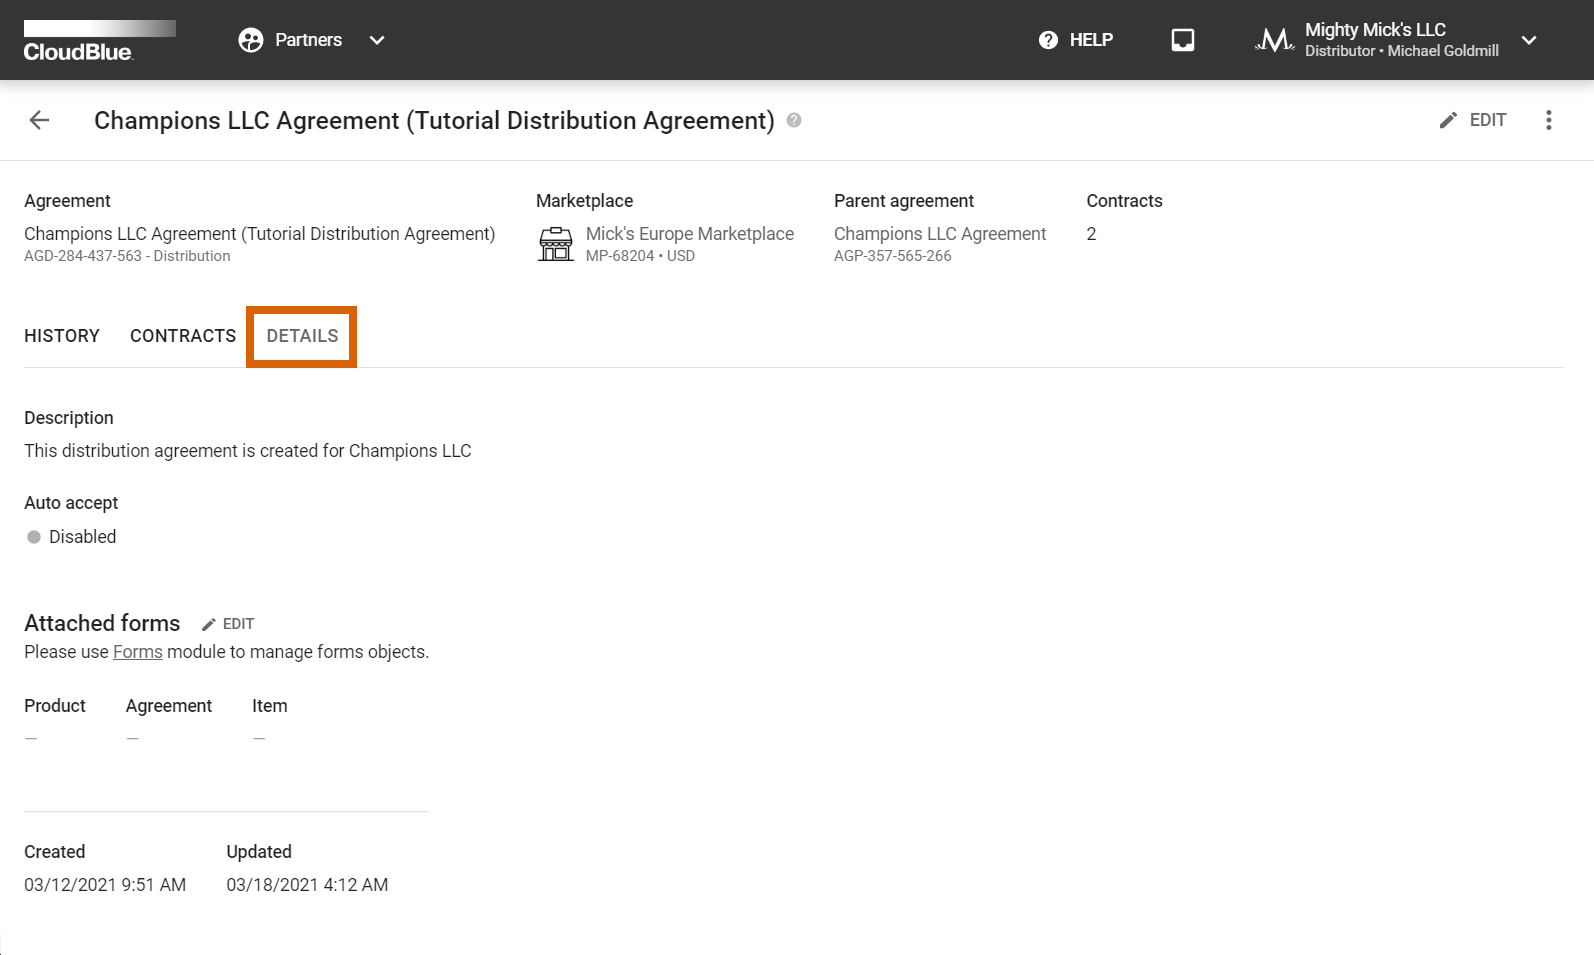
Click the Edit button next to your Attached forms. The following menu allows selecting your create Agreement, Product and Item custom forms via corresponding fields.
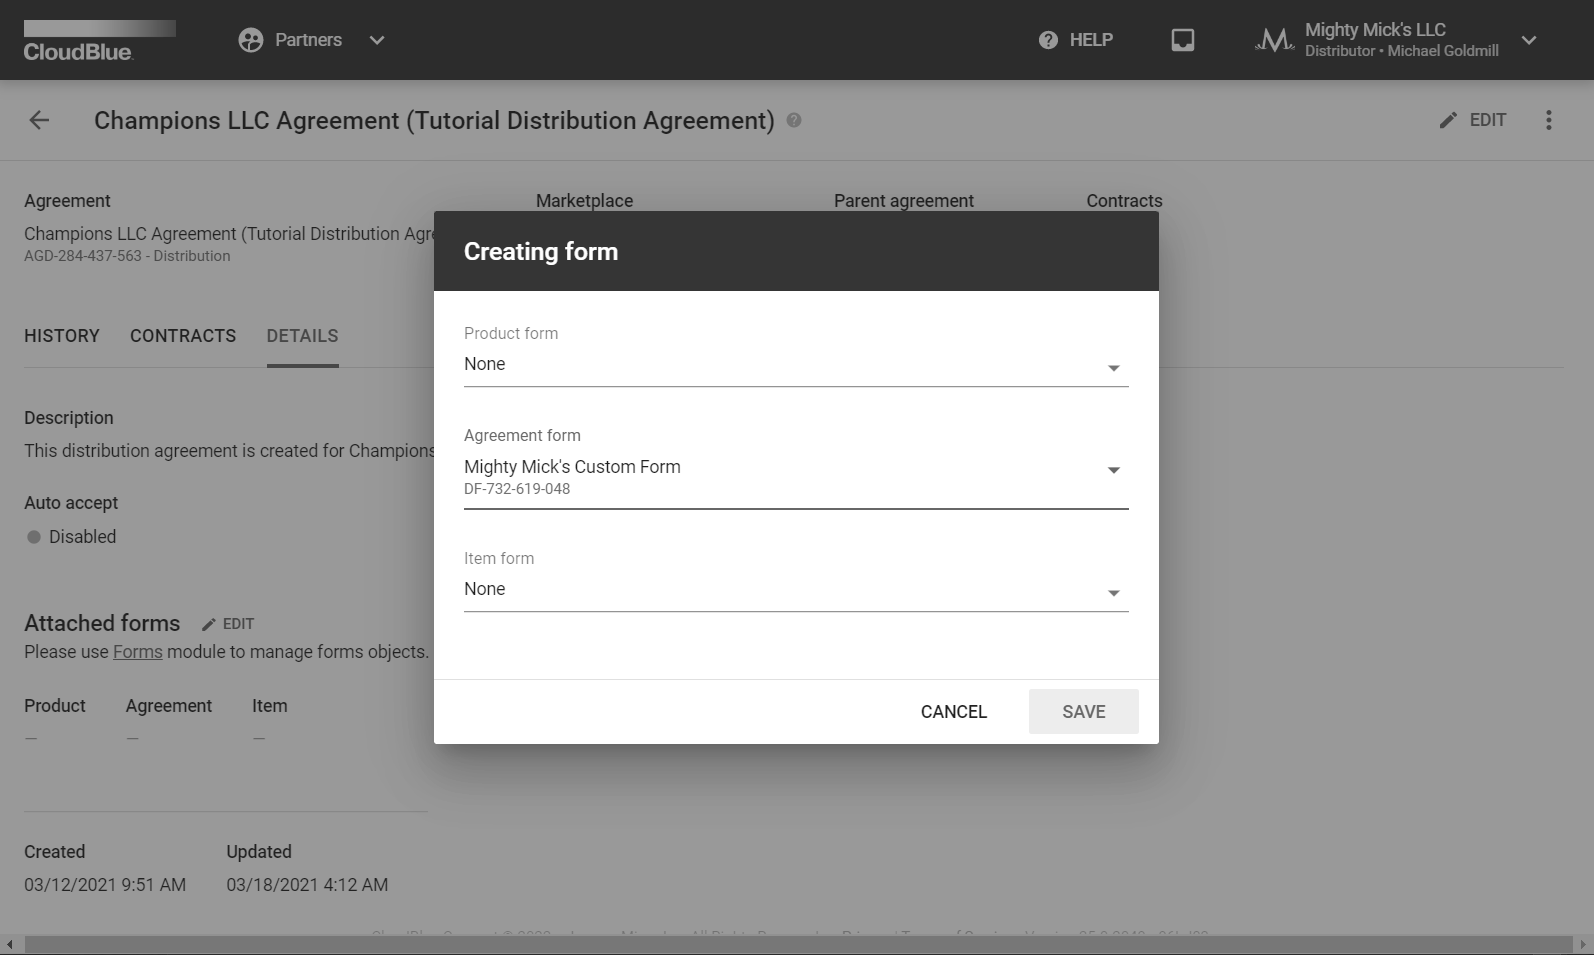
Once all forms are selected, click the Save button to save your attached custom forms.
Therefore, your selected custom forms will be attached to your distribution agreement. Your Vendor will be prompted to fill out your custom form before enrolling the distribution agreement and/or submitting a listing request.
Custom forms are defined via the aforementioned JSON schema field. Each element in your custom form (input field, checkboxes, etc. ) must be described as a JSON element. Connect provides the form preview field that facilitates and rectifies your custom form creation.
Following types of elements of the Form are currently supported:
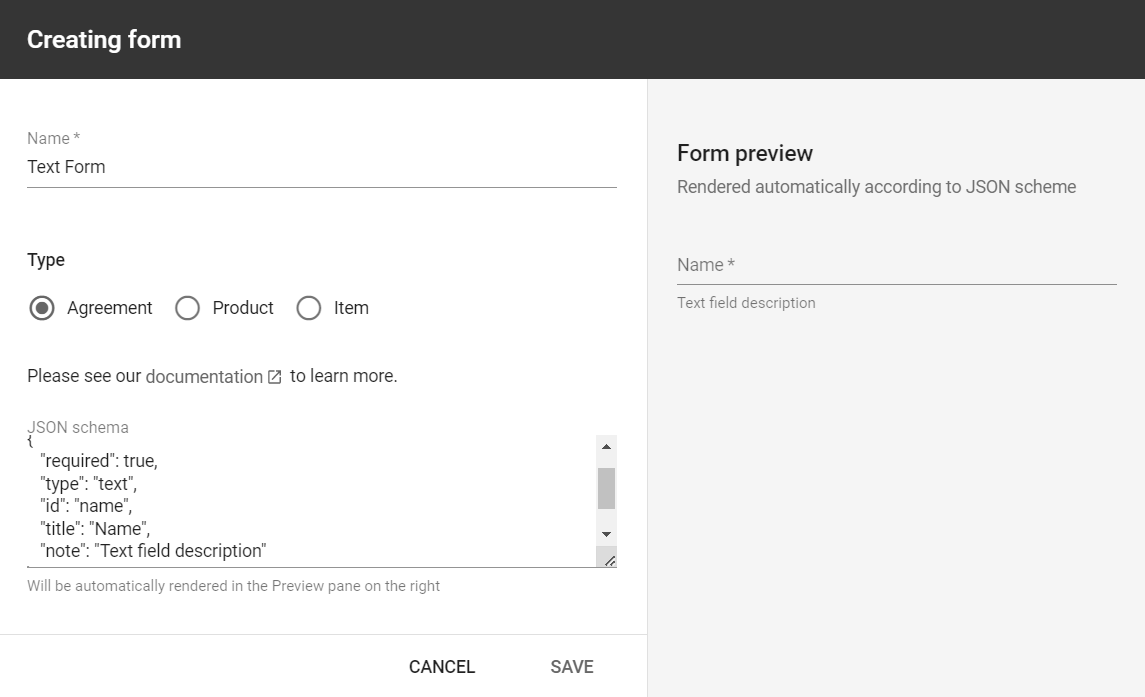
Basic text input field that is generally used to provide usernames, titles or any other data.
JSON Schema:
{
   "required":true,
   "type":"text",
   "id":"name",
   "title":"Name",
   "note":"Text field description"
}
Preview:
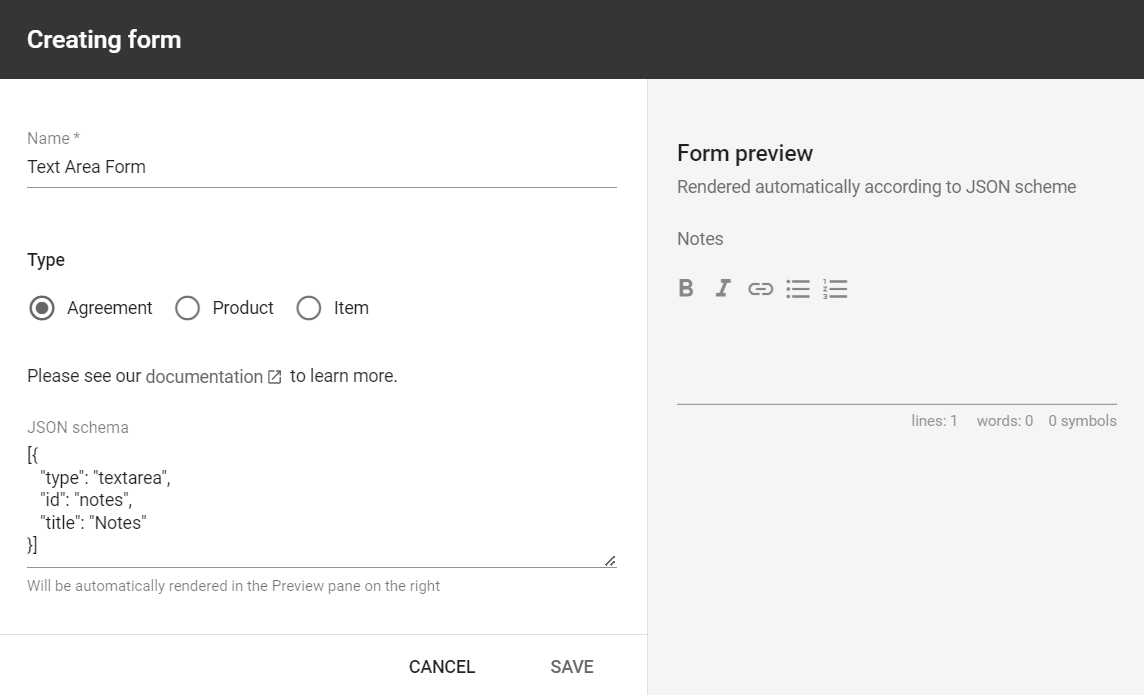
The text area element, as the name implies, allows your business partners to enter text, hyperlinks, and also ordered/unordered lists. This element is often used for passing comments, feedback, notes, etc.
JSON Schema:
{
   "type":"textarea",
   "id":"notes",
   "title":"Notes"
}
Preview:
This element is used to create checkboxes that allow users selecting an option by ticking a box.
JSON Schema:
{
   "type":"checkbox",
   "id":"checkeable_options",
   "title":"Checkable options",
   "note":"Check box Note",
   "meta":[
      {
         "value":"option_1",
         "label":"Option 1"
      },
      {
         "value":"option_2",
         "label":"Option 2"
      },
      {
         "value":"option_3",
         "label":"Option 3"
      },
      {
         "value":"option_4",
         "label":"Option 4"
      }
   ]
}
Preview:

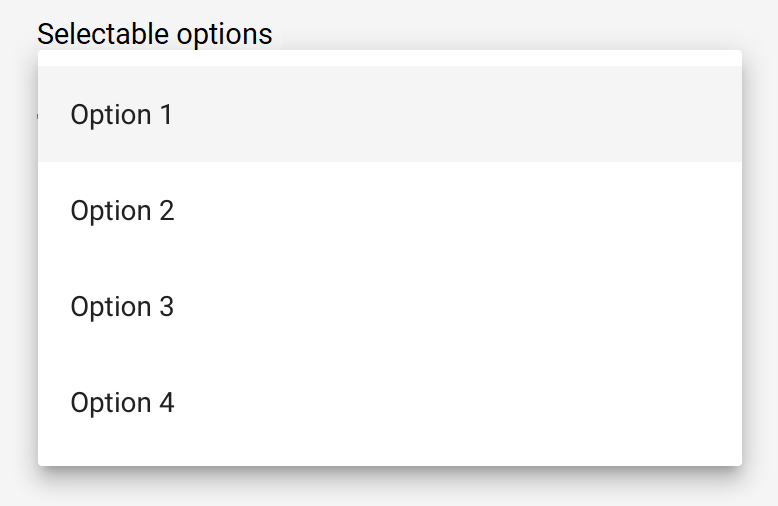
Creates a drop-down list with your specified values so that your business partners can select the option they want.
JSON Schema:
   {
      "id":"chooseable_options",
      "type":"dropdown",
      "title":"Selectable options",
      "meta":[
         {
            "label":"Option 1",
            "value":"option_1"
         },
         {
            "label":"Option 2",
            "value":"option_2"
         },
         {
            "label":"Option 3",
            "value":"option_3"
         },
         {
            "label":"Option 4",
            "value":"option_4"
         }
      ]
   }
Preview:
Use the description element to add your required text between other elements from your custom form:
JSON Schema:
{
   "id":"Description",
   "type":"description",
   "value":"**Bold Text** and new line:  nAnother line of text"
}
Preview:

Divide elements into groups by using this element.
JSON Schema:
{
   "id":"section",
   "type":"section",
   "value":"Home Address"
}
Preview:

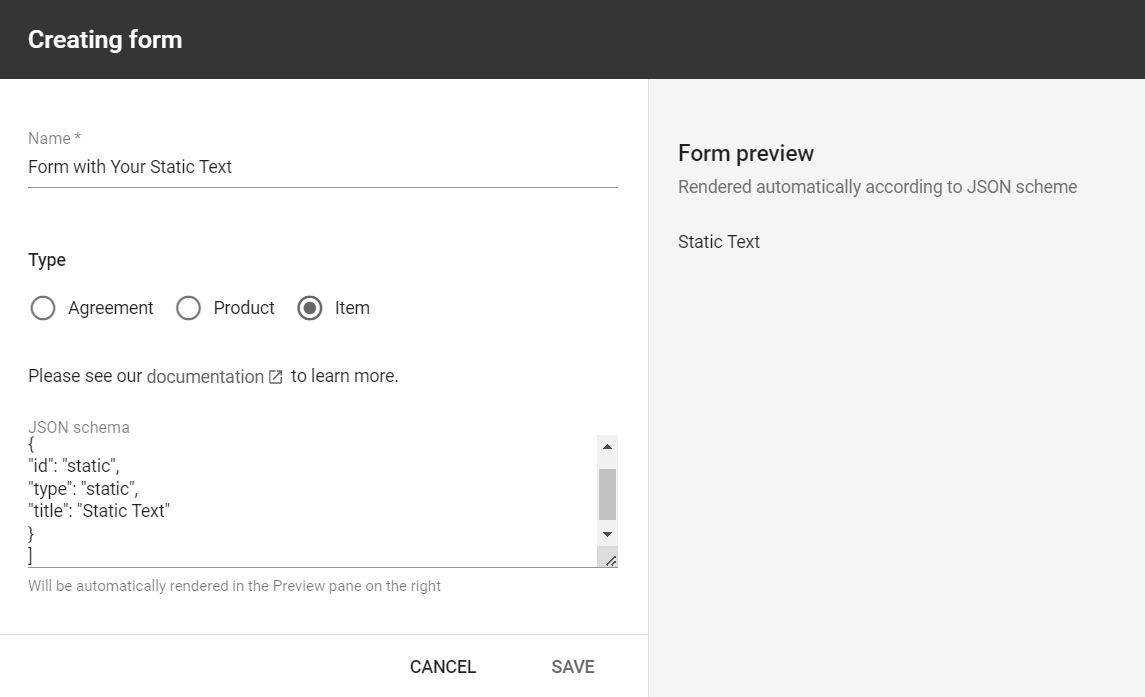
This element allows adding a non-variable text string to your form.
JSON Schema:
{
   "id":"static",
   "type":"static",
   "value":"Static Text"
}
Preview:
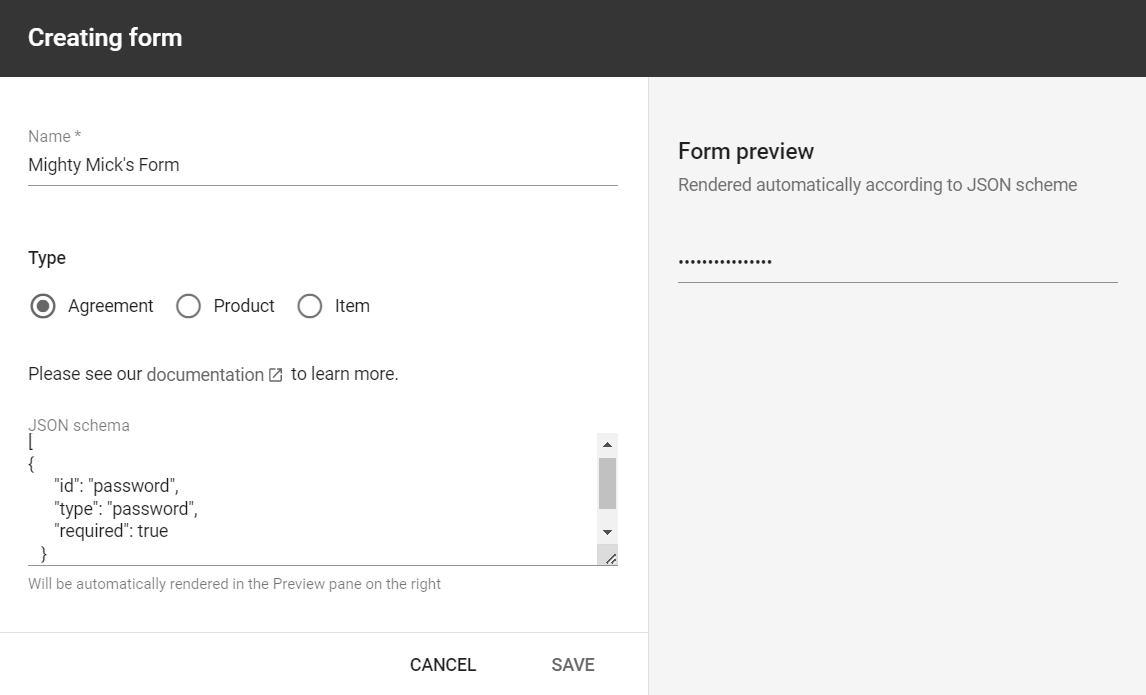
Use this element to add a password field to your form. This field can also contain your title, a note and the required check.
JSON Schema:
{
   "id":"password",
   "type":"password",
   "required":true
}
Preview:
Each element of the form can be described using the following attributes:
| Property | Type | Description | Example |
|---|---|---|---|
| id | string | Identifiers are used to refer field data in the resulting object. Should be unique, alphanumeric, lowercase, separated by underscore. | field_01 |
| type | string | Your field type should contain one of the following values: text, section, checkbox, etc. (for more details, refer to Schema Definition above). | password |
| title | string | Titles, as the name implies, are used to specify the title of your field. Note that titles are localizable. | Field title |
| required | boolean | If set to true, the provided field should be filled in before submitting the form. | true |
| filter | string | Regular expression to check data for validity. | /^[+]*[(]{0,1}[0-9]{1,4}[)]{0,1}[-s./0-9]*$/ |
| meta | array | Additional data for checkbox and dropdown lists. | [ { “label”: “Label 1”, “value”: “option_1” }, { “label”: “Label 2”, “value”: “option_2” }] |
| custom_error | string | Custom errors are used to show your message in case provided values do not meet your filter criteria. | Email should be in format login@domain.name |
| value | string | Default value of your provided field. It is generally used for the description or the section schema. | Default value |
| note | string | Additional explanation or instructions that are specified under your provided field. | Enter your password |
Use the following form as an example for your custom form:
[
   {
      "id":"name",
      "type":"text",
      "title":"Name",
      "required":true
   },
   {
      "id":"section",
      "type":"section",
      "value":"Home Address"
   },
   {
      "id":"email",
      "type":"text",
      "title":"Email",
      "custom_error":"Email should be in format login@domain.name"
   },
   {
      "id":"phone",
      "type":"text",
      "title":"Phone"
   },
   {
      "id":"static",
      "type":"static",
      "title":"Static Text"
   },
   {
      "id":"password",
      "type":"password",
      "required":true,
      "note":"Enter your password",
   },
   {
      "id":"checkeable_options",
      "type":"checkbox",
      "title":"Checkable options",
      "meta":[
         {
            "label":"Option 1",
            "value":"option_1"
         },
         {
            "label":"Option 2",
            "value":"option_2"
         },
         {
            "label":"Option 3",
            "value":"option_3"
         },
         {
            "label":"Option 4",
            "value":"option_4"
         }
      ]
   },
   {
      "id":"chooseable_options",
      "type":"dropdown",
      "title":"Selectable options",
      "meta":[
         {
            "label":"Option 1",
            "value":"option_1"
         },
         {
            "label":"Option 2",
            "value":"option_2"
         },
         {
            "label":"Option 3",
            "value":"option_3"
         },
         {
            "label":"Option 4",
            "value":"option_4"
         }
      ]
   }
]