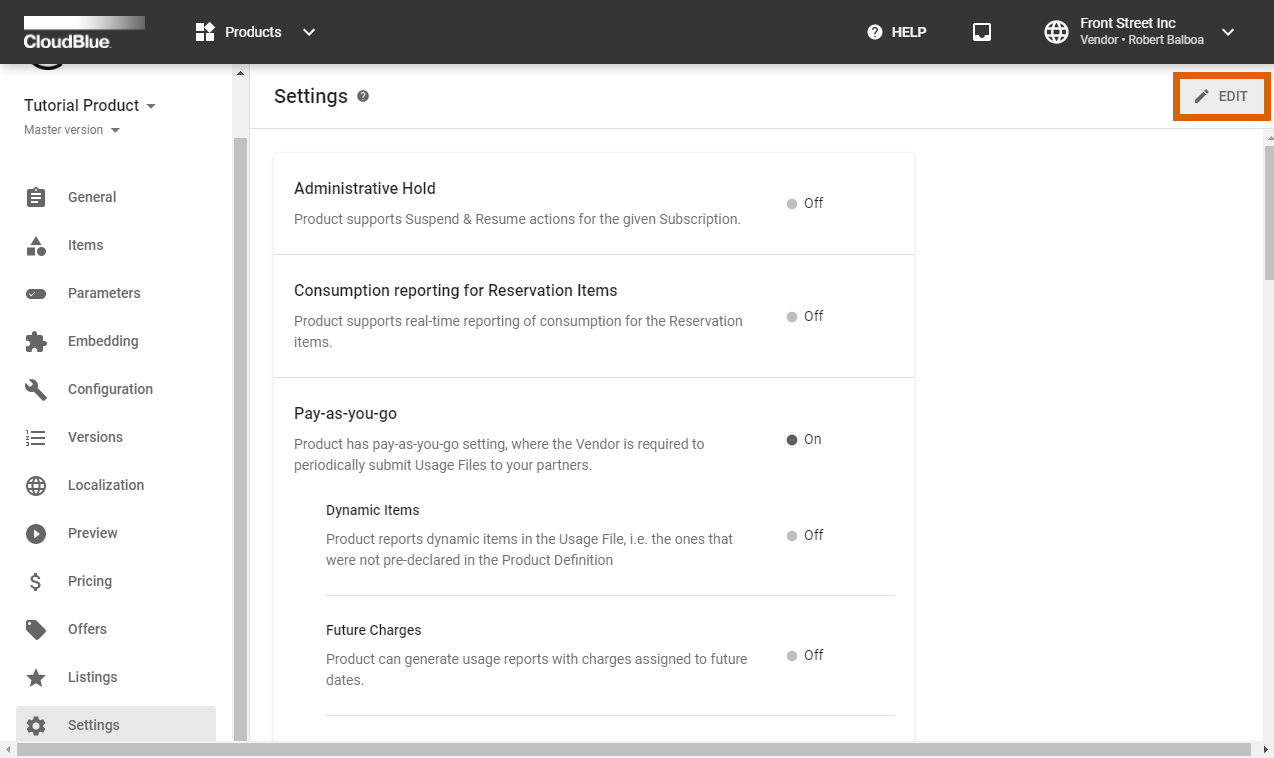
Dynamic validation parameters include draft request validation and inquiry form validation:
By default, the dynamic validation parameters are disabled. Proceed to the Settings tab from the product profile page to enable these parameters.
Click the Edit button to switch on required capabilities.

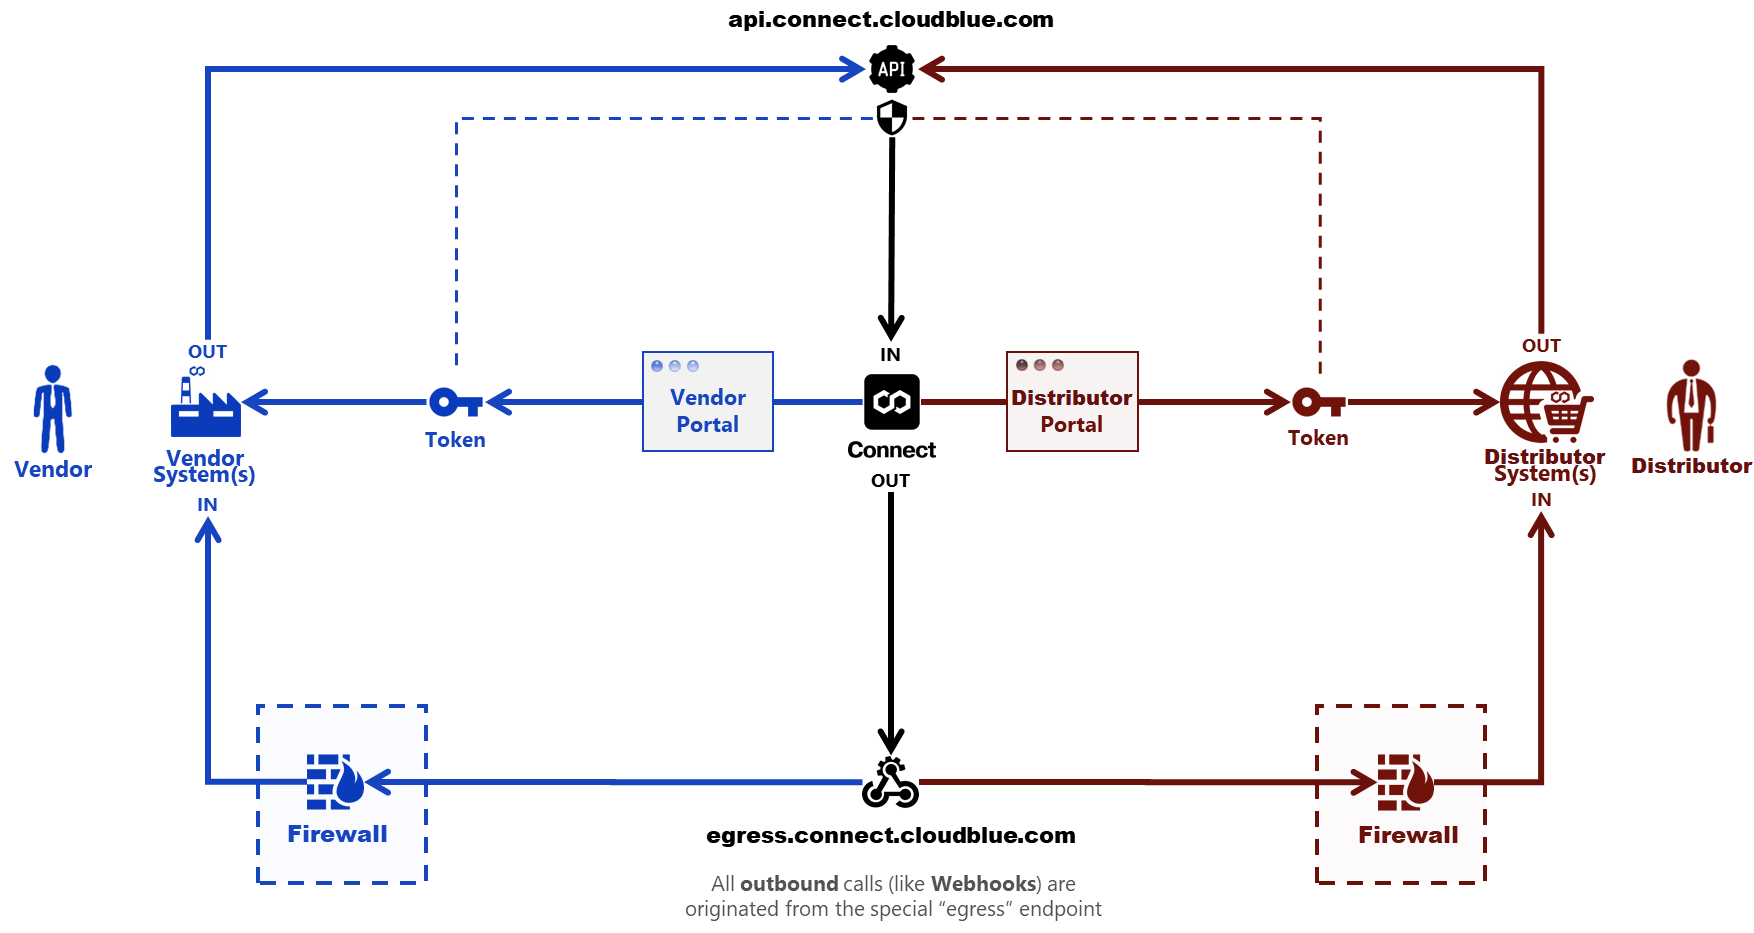
Once the Draft Request dynamic validation is enabled, Vendors can create a Webhook that will be used to perform real-time validation of the Ordering Parameters. Namely, this webhook will be available from the subscription parameters assignment step during the subscription creation that is initiated from the Provider Portal. The following diagram illustrates the dynamic validation capability and webhook interconnection in details:
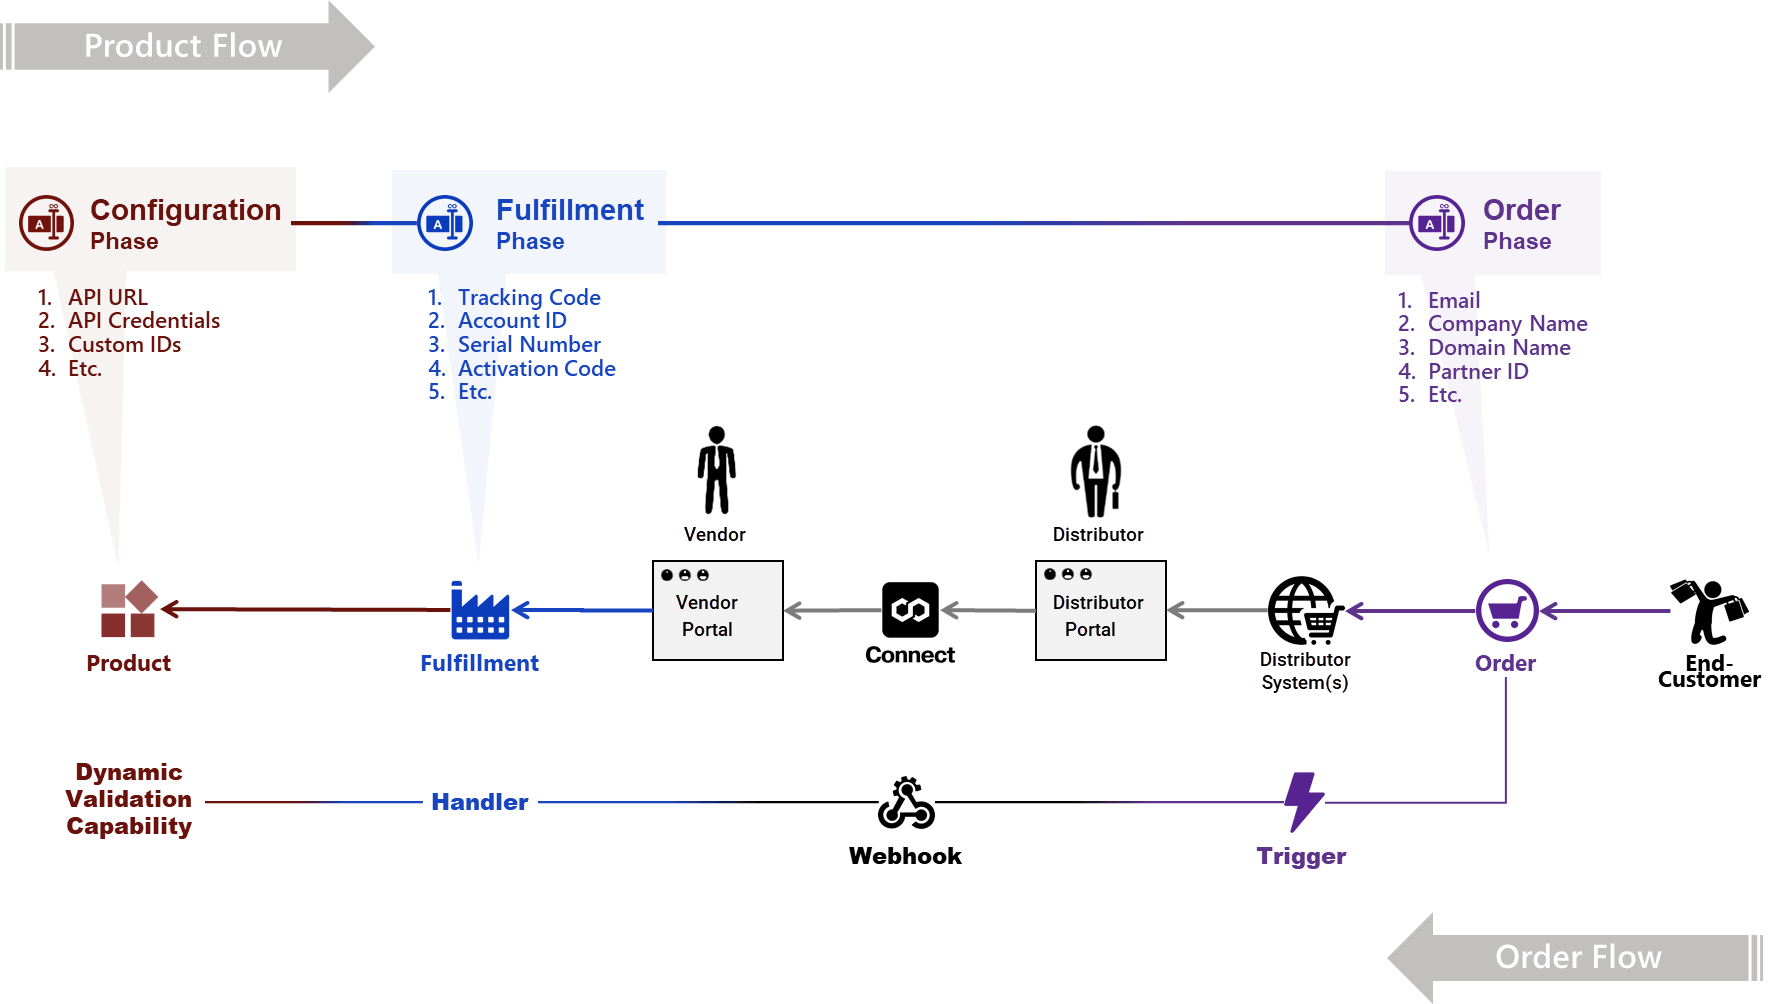
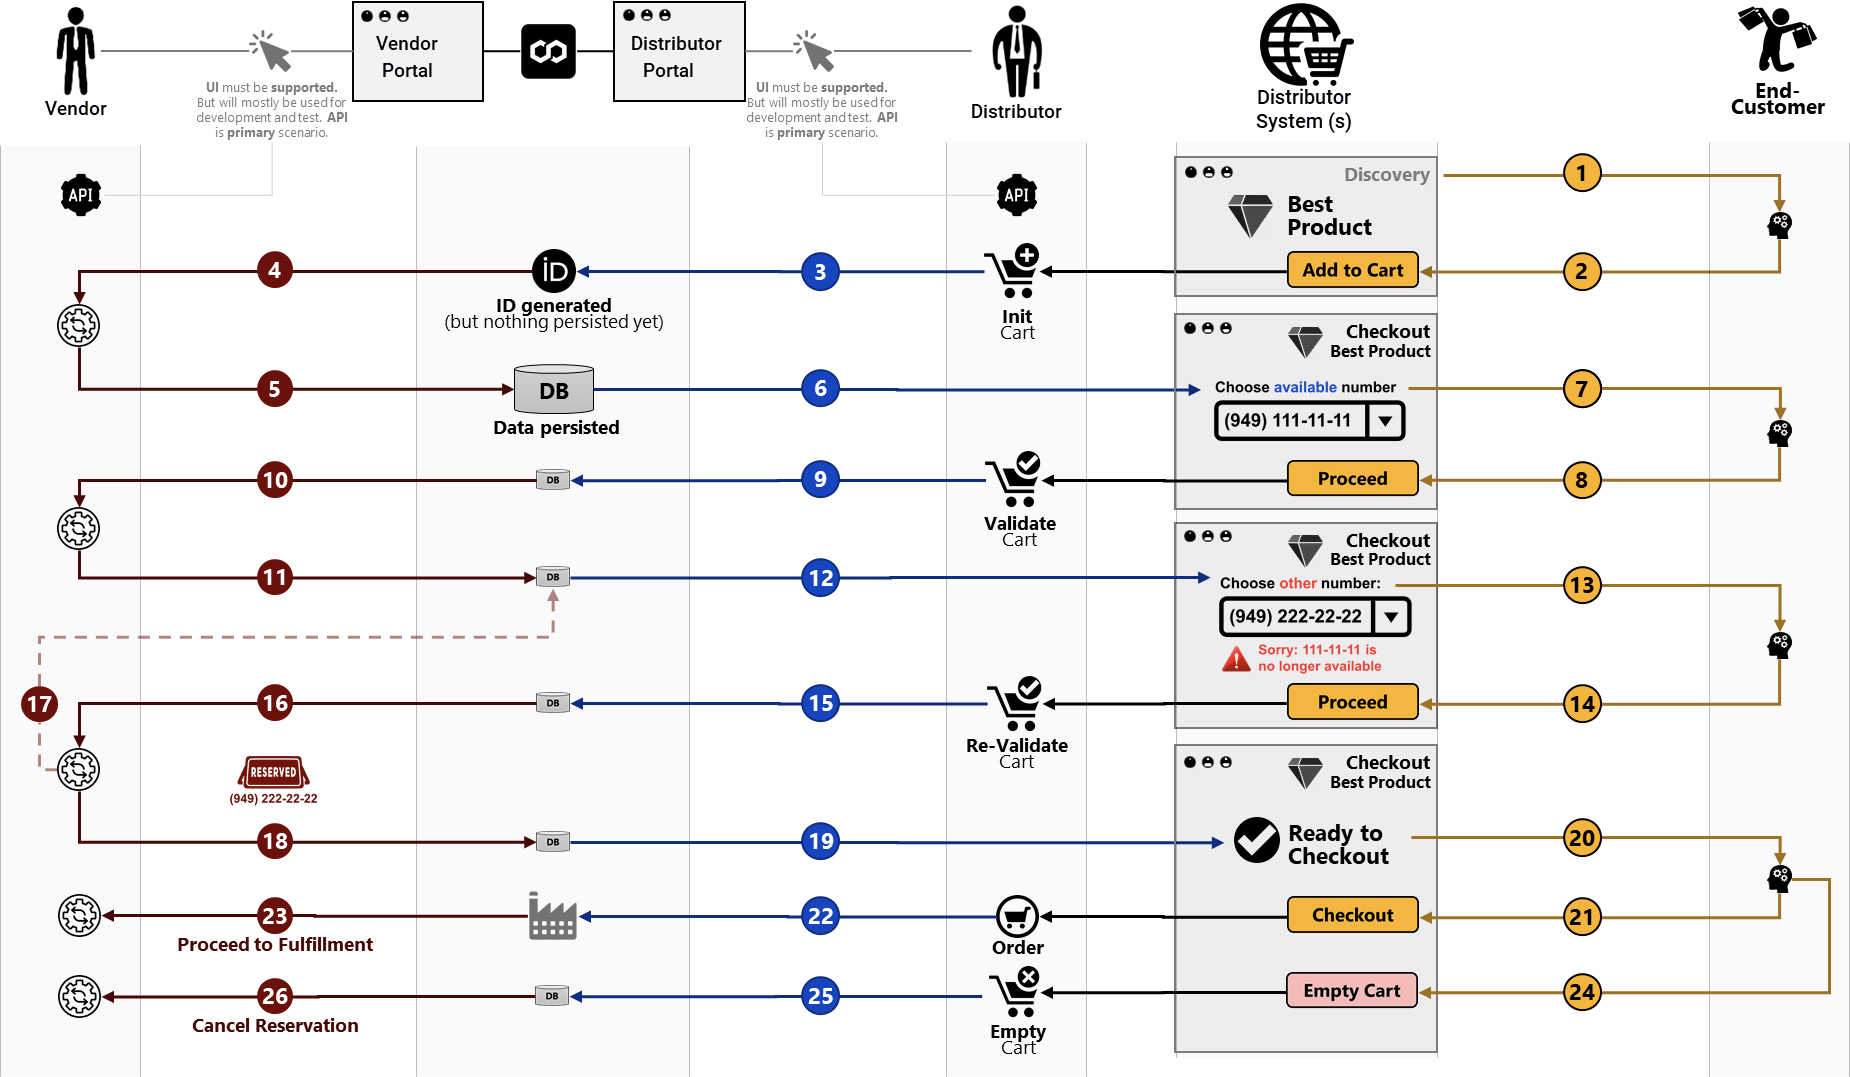
Therefore, enabled dynamic validation capability and a created webhook allows implementing complex multi-step order population and validation scenarios by Providers as schematically illustrated below:
The following explains how to create a webhook for the enabled dynamic validation parameter, how to preview this webhook, and how to implement the aforementioned scenarios.
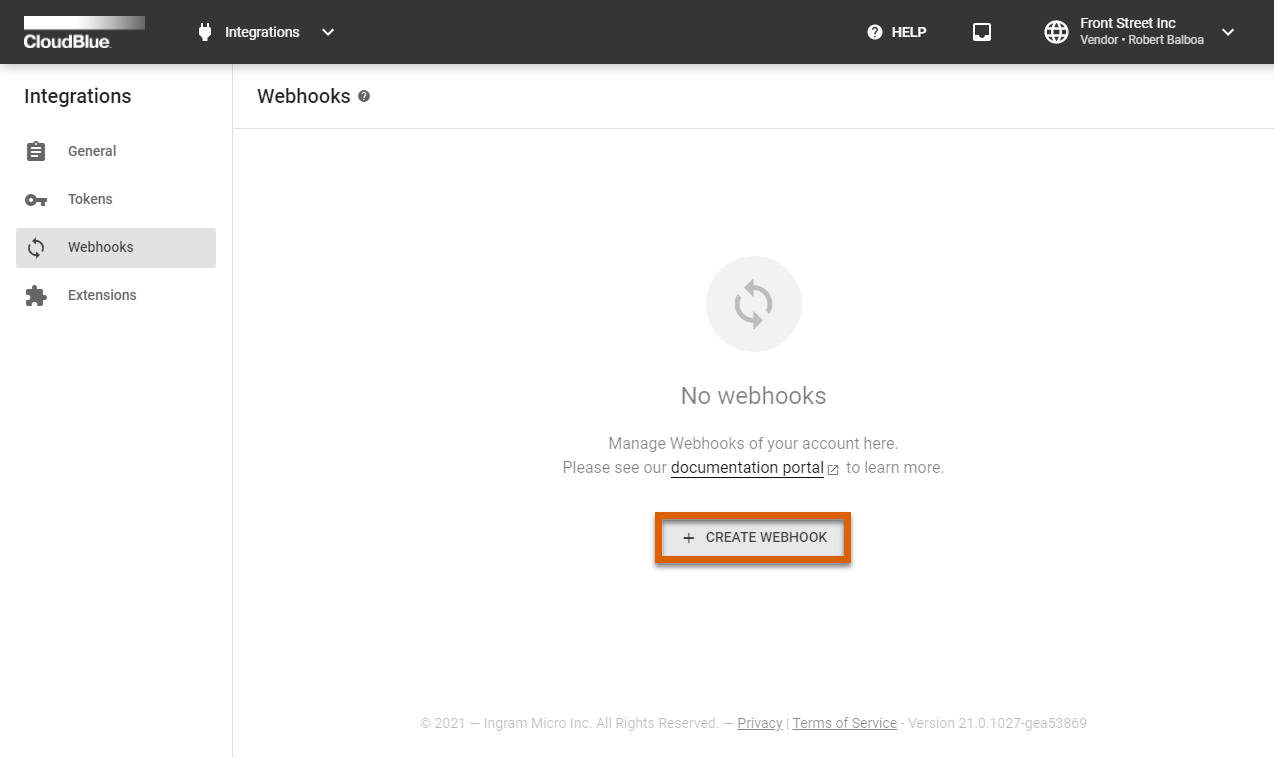
Once Draft Request dynamic validation capability is enabled, Vendors can create a corresponding handler and define a Webhook that will link a product and handler with the validation business logic.
Navigate to the Integrations module from the Vendor portal. Thereafter, proceed to the Webhooks section.
Click the Create Webhook button to launch a webhook wizard.
Follow the steps of this wizard to successfully configure a draft fulfillment request validation webhook.
Provide a name and description for your webhook. Thereafter, click on the Enable switch to switch on this webhook.
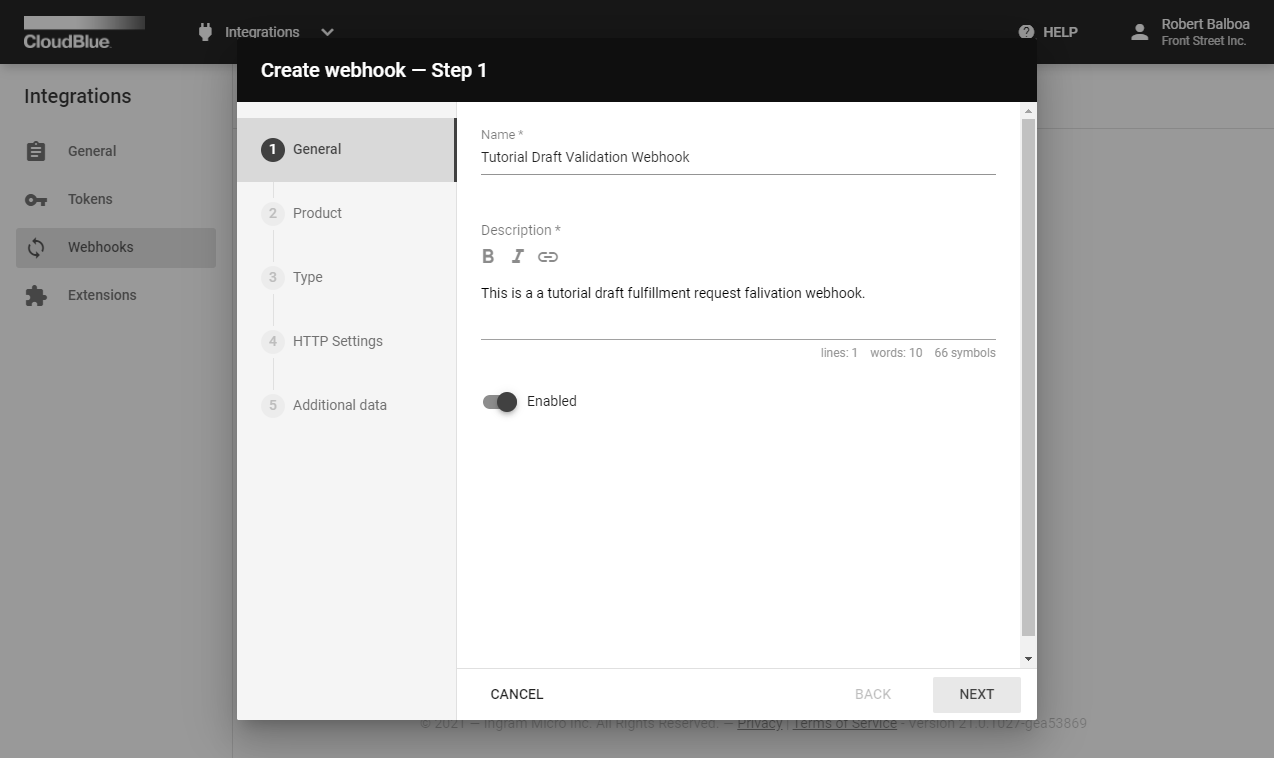
Click Next to continue.
Choose a product with enabled dynamic validation capability and at least 1 configured ordering parameter.

Click Next to continue.
Choose the “Draft fulfillment request validations” Webhook type.

Click Next to continue.
Specify your Endpoint URL and Headers.

Click Next to continue.
Specify an arbitrary JSON object (optional).
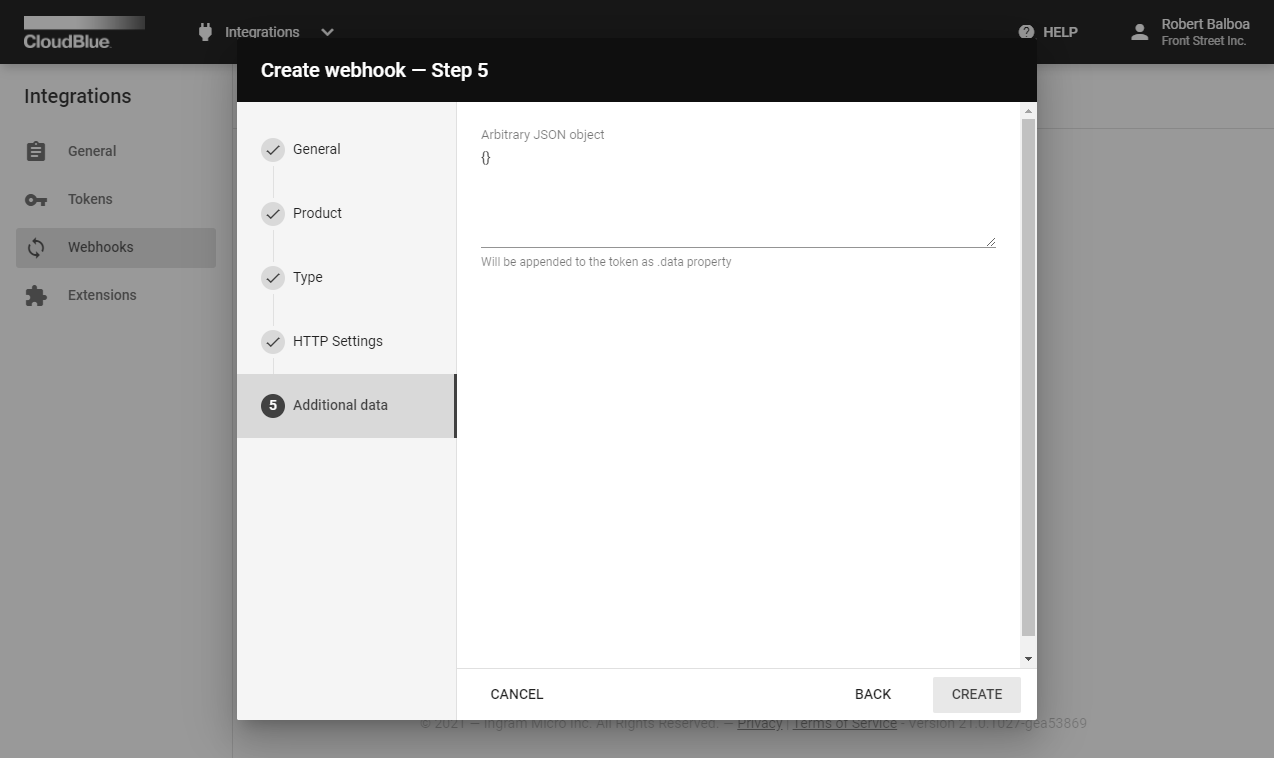
Click the Create button to finish. Thus, your draft request validation webhook will be successfully defined and ready for Vendor test previews.
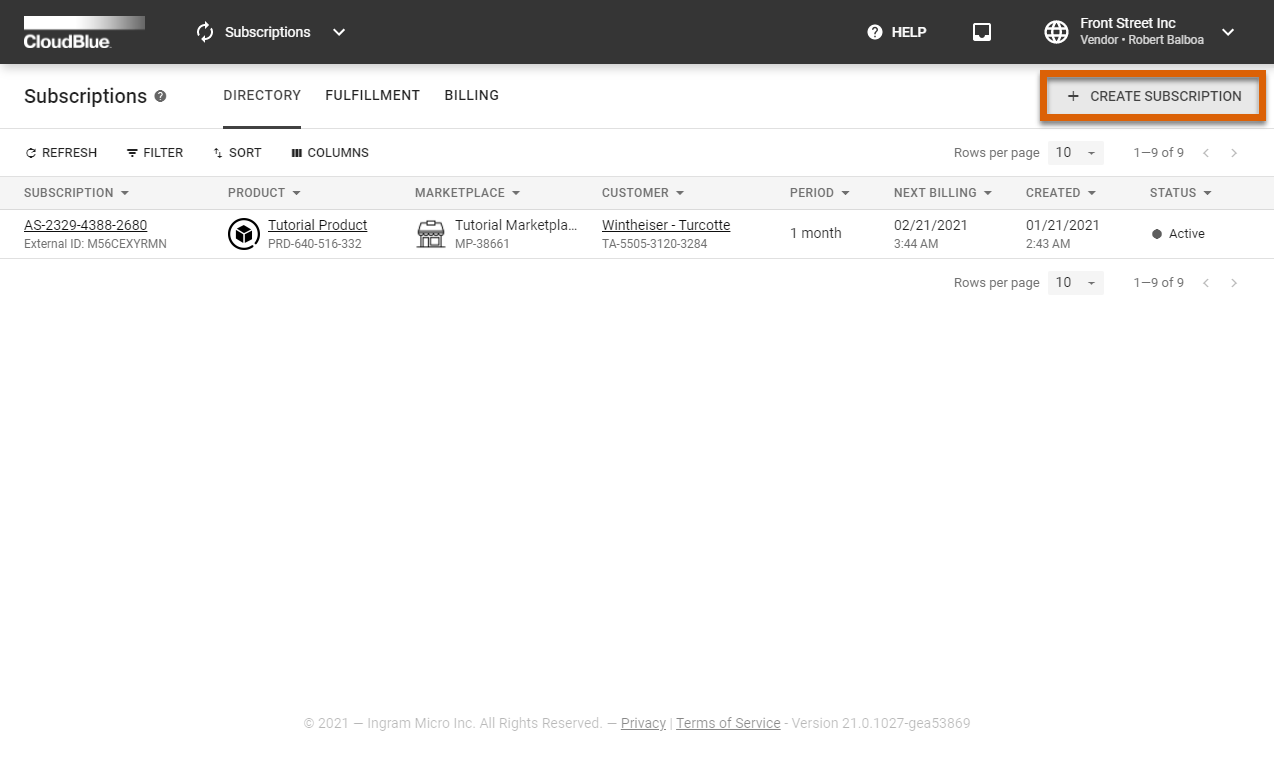
Preview and test out your created webhook by creating a subscription from the Vendor Portal. The following steps showcase how to preview your created draft request validation webhook.
Click the Create Subscription button from the Subscription module.
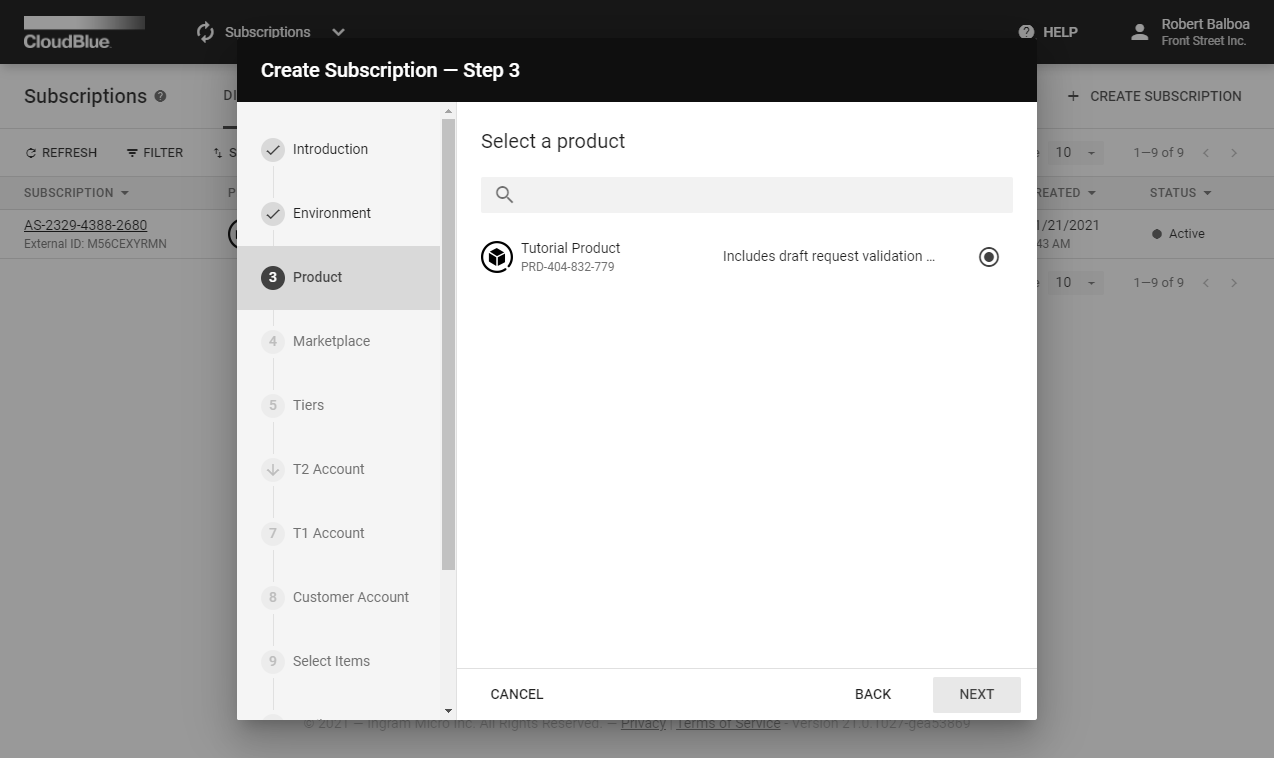
Specify the Vendor internal test (preview) environment after the introduction step.
Select a product that includes Dynamic Validation for Draft requests capability and at least one ordering parameter.
Keep configuring your new subscription: select marketplace, specify tier and account data, validate items, and confirm provided attributes.
Make sure that Subscription parameters assignment and Dynamic validation are switched on.
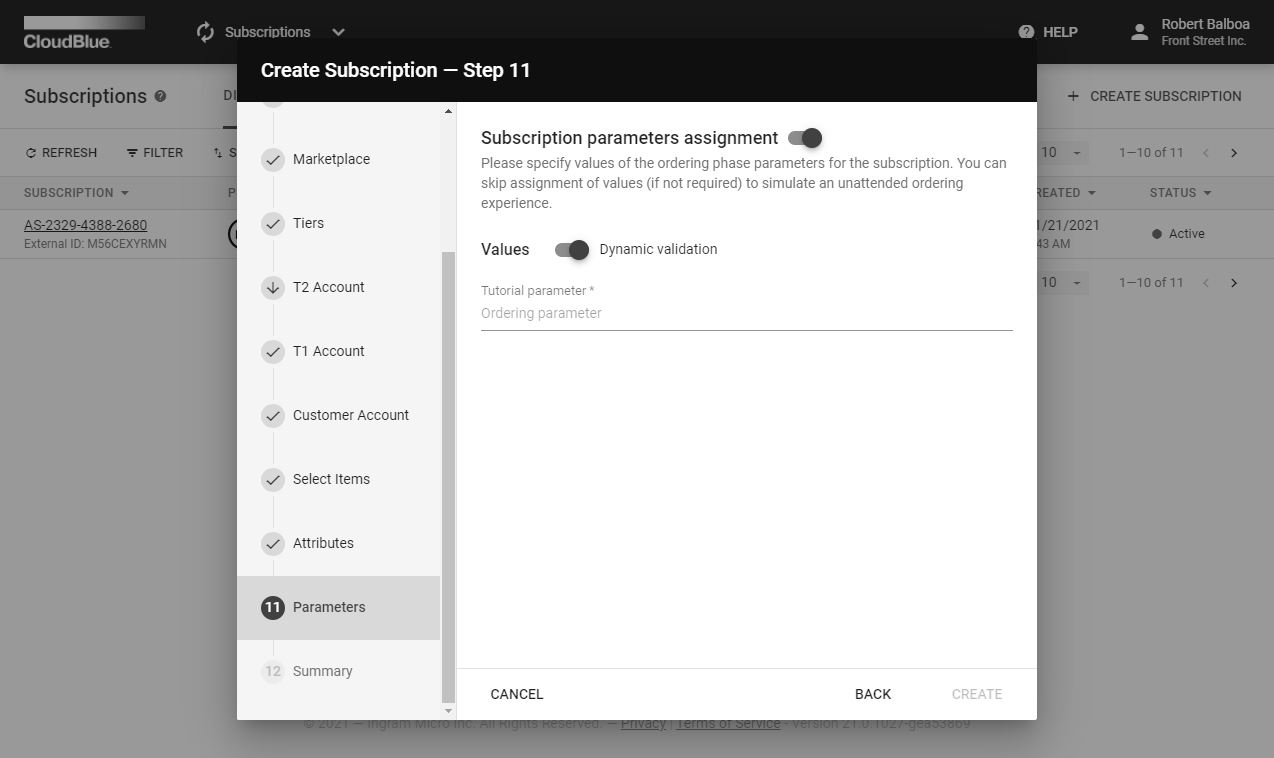
The Parameters step of the subscription creation wizard simulates Provider systems behavior. In case of any error from the dynamic validation script, it displays an error message for users:

The system also allows skipping dynamic validation of a provided value and switch to the inquiring state, in which parameters are asked from users after the subscription creation. Thereby, the dynamic validation of inquiring forms should be switched on.
Validation handler is triggered by the Connect platform from the IP addresses that are specified under a special domain: egress.connect.cloudblue.com. This process is illustrated in the following diagram:
Refer to the Firewall Configuration article for more information.
The webhook payload is presented within the Fulfillment (Asset) Request object:
{
    "id": "PR-2901-1844-5270-001",
    "type": "purchase",
    "reason": "",
    "status": "draft",
    "created": "2020-05-30T07:12:20+00:00",
    "updated": "2020-05-30T07:12:26+00:00",
    // ...
    "asset": {
        "id": "AS-2901-1844-5270",
        "status": "draft",
        // ...
        "params": [
            {
                "id": "order_parameter",
                "name": "Order Parameter",
                "type": "text",
                "description": "Parameters are important",
                "value": "123",
                "value_error": "",
                "value_choices": [],
                "title": "The Order Parameter"
            },
            // ...
         ],
        "tiers": {
            // ...
        },
        "configuration": {
            "params": []
        },
        "marketplace": {
            "id": "MP-54865",
            "name": "Germany",
            "icon": "/media/PA-239-689/marketplaces/MP-54865/icon.png"
        },
        "contract": {
            "id": "CRD-00000-00000-00000",
            "name": "ACME Distribution Contract"
        }
    }
}
CloudBlue Connect expects same structure that was sent to the handler and that was received from the handler. Furthermore, the asset.params section should be modified to represent your handler.
The value_error property from this parameter contains an error description string in case any validation error occurs. If validation is successful, value_error is expected to be empty.
Webhook handler can use the following options for the caller authentication procedure:
The aforementioned options provide flexible authentication configuration of any complexity.
Create a sample Product with a single ordering phase parameter id = ‘ordering_param_1‘ that will be used by a sample handler business logic described below.
Test the dynamic parameters validation functionality by using the following sample webhook handler written using the Flask (https://flask.palletsprojects.com) framework.
#!/usr/bin/env python
# dynamic-validation-example.py

from flask import Flask, request, json
api = Flask(__name__)

def get_parameter_by_id(params, id):
    for param in params:
        if param['id'] == id:
            return param
    raise Exception('Parameter {id} not found.'.format(id=id))

def set_parameter(params, param):
    ret = []
    for p in params:
        if p['id'] == param['id']:
            ret.append(param)
        else:
            ret.append(p)
    return ret

@api.route('/validate', methods=['POST'])
def do_validate():

    data = request.json
    params = data['asset']['params']

    param_1 = get_parameter_by_id(params, 'ordering_param_1')
    param_1['value_error'] = 'This error is from my validation script!'
    params = set_parameter(params, param_1)

    data['asset']['params'] = params
    return data

if __name__ == '__main__':
    api.run()
This script shows that POST handler within the /validate path that unconditionally returns an error associated with the ‘ordering_param_1‘. Therefore, it allows adding any custom/test logic on the top.
Copy the aforementioned script and run it with the following simple command:
$ python ./dynamic-validation-example.py

 * Serving Flask app "dynamic-validation" (lazy loading)
 * Environment: production
   WARNING: This is a development server. Do not use it in a production deployment.
   Use a production WSGI server instead.
 * Debug mode: off
 * Running on http://127.0.0.1:5000/ (Press CTRL+C to quit)
127.0.0.1 - - [30/May/2020 23:00:59] "POST /validate HTTP/1.1" 200 -
Thus, it will run a webserver on your local machine on port 5000.
Running on port 5000 on your local host will not allow CloudBlue Connect to trigger it, unless your port is forwarded. Thereby, it is required to make this script accessible from the Internet, so that the Connect platform is able to trigger it.
It is recommended to use the ngrok (https://ngrok.com) tunnel. Download and install ngrok on your machine and make local port 5000 visible to the internet by running the following command:
$ ngrok http 5000

ngrok by @inconshreveable

Session Status                online
Account                       CloudBlue Connect
Version                       2.3.35
Region                        United States (us)
Web Interface                 http://127.0.0.1:4040
Forwarding                    http://YOUR-SUBDOMAIN.ngrok.io -> http://localhost:5000
Forwarding                    https://YOUR-SUBDOMAIN.ngrok.io -> http://localhost:5000

Connections                   ttl     opn     rt1     rt5     p50     p90
                              0       0       0.00    0.00    0.00    0.00
Therefore, your sample validation handler will be accessible via the http://YOUR-SUBDOMAIN.ngrok.io/validate URL.
Once your a dynamically generated http://{YOUR-SUBDOMAIN}.ngrok.io/validate handler is configured, update your webhook URL setting with that value to enable CloudBlue Connect to communicate with your sample validation script.
Once your webhook URL is configured, create a subscription and follow to the Parameters step. The system should provide your error message:

Thus, your custom validation logic from the sample script has successfully returned an error value. Add additional validation logic by following this example to meet your business requirements.